Showing posts with label tips and tricks. Show all posts

July 29, 2012

So, Whatever Happened To My Miss Boa?

Okay, so I dropped off the face of the earth for a number of reasons, perhaps leaving some of you wondering...what happened to Miss Boa?  Did everything turn out alright?  How was the wedding?!  What did her dress actually look like?!

Miss Boa's faux Weddingbee icon! (Copyright of Christos Georghiou, via purchased license) Well the Miss Boa series shall continue, with bits of posting here and there in between my own wedding planning posts! :D

(It feels so cool to talk about my actual, real-life wedding!!! *squee!*)

So...
Where did we leave off?

Oh yeah, she pretty much planned her entire wedding in two weeks time!  o.0

Miss Boa = planning wizard

Wedding Planning Wizard!

So what was next on her to-do list? --the bridesmaid dresses!

It all started out harmless enough, in order to find a dress we could wear later on, she asked her fellow 'maids what kind of dresses they like, told us what color she wanted, and to help with costs, we could pick dresses from department stores, given that the dress was in everyone's size :P

Well, this turned into a "EVERYONE WANTS TO BE INCLUDED!" message fest, and poor Miss Boa soon had posts pouring in on all sides, and the trouble was, everyone had their own style and ideas!

(Of course, my ideas where the best :D Just kidding!)

Not to mention that the wedding party had three...umm...height-challenged girls, (myself included XD) and two very tall women!  So body types were pretty much across the board here!

This went on for a few days until Miss Boa realized that she would just have to pick the damn dress herself!  Off to Victoria's Bridal Shoppe she went, (since a bridal shop can cater to all dress sizes,) found a lovely black and teal number, sent us a photo, and that was that!  The bridesmaids dress was chosen!

Miss Boa's Black and Teal Strapless Bridesmaid Dress!
A sneak peak at my bridesmaid attire! :D

Now...I'm going to tell you something that I didn't even tell Miss Boa...

I got the dress a size smaller than I should have.

XP

I know!  This is such a bridesmaid no-no!  If you take anything from this post, remember this:

"DON'T get the bridesmaids dress a size smaller and say you'll lose the weight!"

Did I manage to lose the weight?
        Well yes, obviously, or that thing would have never zipped up! XD
Was it a stressful time losing the weight?
        Yeah...it was...
Could this situation have cause a major problem for the wonderful Miss Boa?
        Absolutely.

Even though I knew I had the time to lose the weight, and it was a fairly reasonable amount to lose, nothing too drastic, there are just so many things that can go wrong that it's still a slippery slope to go down.

But let me tell you, nothing is more motivating than knowing that come hell or high water you're going to have to come to a wedding in that dress!

Trouble losing weight for a bridesmaids dress

Oh! Another thing to take with you:

"Think about the style of dress you are choosing, and if possible, try it on.  See for yourself how your bridesmaids will feel wearing the dress"

As much as I and the other bridesmaids love Miss Boa, this was a hard dress to wear!

As you can see it had an empire waist and a pencil skirt, and it was that combination that prevented us from sitting down properly!  At least we looked fabulous :D and we still were able to get through dinner! lol

The thing was no one realized this would be a problem until we were at the wedding, and it looks perfectly harmless in photos!

So take note brides-to-be!  And bring more comfort to bridesmaids everywhere!

May 11, 2011

Craigslist Is A Bride's Best Friend

I know...craigslist...

Craigslist logo.The borderline between awesome and shady, great deals and spammers, because no one knows who's really on the other end...

But craigslist is so your friend if you know how to use it!

Just the other day I was doing my regular craigslist search for awesomeness, (because I could still use a few furniture items for the house and whatnot,) I found an ad for eiffel tower vases.

An eiffel tower vase.(Which did not come up when I searched for "wedding" and was in the household items section, so look in all sections to find potential hidden gems!)

Being obsessed with weddings, :) I couldn't help myself and viewed the listing.

" 20" Eiffel Tower Clear Glass Vases - $60:

20" Clear Glass Eiffel Tower Vases in excellent conidition.
Used once will silk flowers, no water has ever been in them.
Make great centerpieces for weddings and special events.
Have weighty base for stability.
Have 29 vases.
"

29 vases...for $60?!?!

I thought it was too good to be true.

So I quickly sent an email to the seller, (always put your first name only in the email to make things more personable and less spam-ish, without giving away your complete identity,) asking if they still were available and confirming that all 29 vases were in fact jointly priced for $60...and she said yes, all for $60, and left a phone number.

OMG MY JAW DROPPED TO THE FLOOR!

Jaw drop at the office computer!
or rather, dropped to the table XD
That works out to be $2.07 per 20" vase!!!

I. could. not. pass. this. deal. up.

I called right away, and scheduled the pickup at a large store plaza that was (generally) a midpoint between where we both worked. Great! A public area so I know I won't get mugged! XD

Usually I take someone with me just in case of shifty situations, (and I probably should have taken someone with me anyways,) but a public place is a much safer bet than a private residence. Never go to a private residence alone!

The seller was in fact the mother of the bride who used the vases, and the nicest woman ever!

She chatted with me about her daughter's wedding, told me what her centerpieces were like, asked what I was using them for, (to make things straightforward I told her I was planning on using them for my own wedding...telling her about my blog and hopes and dreams would have been TMI for a stranger! XD)

Meanwhile I had to keep myself from blurting out "OMG these are so cheap, do you know these things sell for at least $5 everywhere else?!?"

Then she helped me load up the car, I paid her the $60 in cash, (most sellers will not deal with anything besides cash for small purchases,) wished me well, and was off!

And now, I have 29 crazy-cheap 20" high eiffel tower vases, ready for unexpected increases of guests and centerpieces, proud and triumphant!!!

A triumphant jumping shopper!
Whee!
So in conclusion,

Craigslist is AWESOME!

January 10, 2011

Conquering the DIY Wedding Cake: Decisions, Decisions

So, you read my first DIY wedding cake post, and you still feel that you have what it takes! Good for you! Here are some of your options:

1) The tiered cake

An elegant purple tiered wedding cake.
I would only recommend this option to the seasoned baker or pastry chef. The simple fact of the matter is you have two options: Last minute assembly before the reception, or nail-biting transport of the cake.

This is due to the fact that a tiered cake will have seams in between each of its layers, so decoration of piping, fondant strip, flowers, etc. will be needed to dress up the area where the tiers meet. If you do this all beforehand, are you really going to guard that 4-tier cake from every bump on the road on the hour car ride to your reception!? Transporting a cake with the tiers separated makes sense for transport.

However then the question is who is going to assemble the tiers once you get it safety to the venue? And who could you trust to do it right? This is why I would personally stay away from this DIY option, if you can help it.

But if you can pull it off, you have the most grand option at your wedding for a fraction of the cost! The real question here is whether all that trouble is worth it.

2) The tiered display cake

Mrs. Deviled Egg's tiered display wedding cake.
This cake would be similar to this display cake constructed by Weddingbee's own Mrs. Deviled Egg. (I thought this was an original idea of mine, just goes to show every wedding idea has been done! lol) This is a cake made of mostly Styrofoam, covered with fondant, with one cake layer for the cake cutting event.

This is a great option for a DIY bride because this can be done in advance. You and your handsome groom will be the only ones to eat this cake, so if you wanted to make it a week beforehand, go for it! This one gives the bride the most room to breathe. You can either order plain sheet cake from a bakery or you could make the sheet cakes yourself, but at least you wouldn't have to worry so much about decoration when dealing with the sheets, just (relatively) match the base color of the cake, and tada! No one will even notice.

The main issue with this option is making sure that the display cake will still look the same after it's been sitting around for an extended period of time. No one will spill anything on it, dust will not dirty up your pristine white fondant, the humid summer air will not melt your buttercream flowers, etc.

Since most of the cake is Styrofoam, you could glue the layers together (minus the cake layer!) for added stability with transport. A tiered display cake assembled in this way will have much more stability than any real cake. If your still worried about the cake layer falling off, make a partial cake layer by cutting out a portion of the Styrofoam and fill it with cake layers. Now every layer can be securely glued together! Just remember where you put the actual cake for the cutting! :)

3) The tiered cake deconstructed

Mrs. Pencil's elegant wedding cake buffet.
Photo copyright and courtesy of B. Scott Photography

This is what I am considering doing for myself. Instead of dealing with the stress of assembling/transporting a tall, tiered masterpiece, do a more modern twist of the wedding cake and do deconstructed, separate layers with varying sizes. Extremely similar to what Weddingbee's Mrs. Pencils did with her cakes.

This way, one doesn't have to worry about having a "fake" display cake, and have all the cake out there for all to see. But this wouldn't be as hard to transport with the individual layers and could be done a couple days in advance as well! The only setup with these cakes would be placing each on a cake stand, which should (hopefully) be easy enough for any helper :)

Another note: Ever heard of the budget saving tip "Don't tell your vendors it's a wedding?" Well it doesn't always work out so easily, (*cough* venue! *cough*) but with this deconstructed style, you can have your cake and at a discount!!! Say it's for a fancy birthday party, 50th anniversary, whatever. Since it's not the usual style of a wedding cake, they won't think twice about it.

4) Small tiered cake with cupcakes or sheet cakes in the back


Cute small wedding cake with cupcakes, all decorated with navy sugar flowers.
Very similar to the previous choices, but now the fancy decorated cake is much smaller, making it easier to manage for a new-comer to baking. Smaller pieces of fondant are easier to drape over cake, less decorations are needed, less worries about the structural integrity of the cake, all equals less stress for the bride!

Similar to the display cake, the sheet cakes do not have to be lavishly decorated, and cupcakes described below will only need minimal decoration, making their execution much easier. This can also be done a couple days in advance.

5) A homestyle cake buffet

A cozy, homestyle wedding cake buffet.
This I believe is the easiest for any bride to do because you don't even have to do anything professional looking! You're going for the homestyle, comforting, straight-from-Mom's-kitchen look, so just swirl your frosting around or smooth it a bit and be done with it! Pick a variety of different flavors to make more interesting! Very stress-free, and great for any causal daytime wedding!

6) Mini-cake favors


Mini Wedding Cake Favors
Probably the most time consuming option, giving all your guests their very own mini wedding cake. It doesn't seem that way at first glance, but realize that unlike cupcakes, your doing all the steps involved with one full wedding cake. So while it's a really fun idea...make sure before you start that you can handle doing something as time consuming as stacking, cutting, frosting, rolling fondant, covering, and decorating 50 times over and not go crazy. XD Which is why I would highly recommend recruiting help for this project!

If one does dare to attempt this, it would truly be a hit with your guests!

I would ask your baker if this would cost more or less than doing that tiered cake you may be considering, however it may end up costing more just due to the amount of labor. But you never know.

(This could also be a good candidate for the "don't mention it's a wedding" tip)

7) Cupcakes

Purple and ivory wedding cupcakes.
This can be one of the easier options if the right elements are chosen. The main goal for this is finding a way to dress them up enough so they look like "bridal" cupcakes. A fancy garnish for each one, some pretty piping, or some lacy cupcake wrappers, will all help elevate your cupcakes to fit in with your wedding.

So if the difference between making your cupcakes "bridal" and "ordinary" are these complicated tiny sugar orchids you're supposed to make yourself...yes, cupcakes will be difficult. If it's adding a small edible flower to each one, then yes, they will be easier. Remember, everything will have to be done 50+ times over!

Another option is filling your cupcakes with special tip made for filling pastries and a pastry bag with some yummy jelly or buttercream. This will help give your cupcakes a special something and make them more like regular wedding cake.

As I'm sure many of you brides know, bakery cupcakes are usually cheaper than traditional bakery wedding cakes. You could also use the "don't mention it's for a wedding" card here, although since they're becoming more popular for weddings, it may or may not be harder to pull off.

8) Dessert buffet

An impressive wedding dessert buffet.
Not a cake person? They DIY may be perfect for you! Go crazy doing anything from pies, to cheesecakes, to a whole dessert assortment! Your only limited by your time and resources before the big day, (ask for help for multiple desserts!) so make sure you do practice runs for this option as well, and set aside time wisely!

So that's the list, I hope I was through enough to include all wedding cake options, and I hope you can find something that's a great fit for you!

January 7, 2011

The Cricut's Here!!!

My Pink Journey Cricut!8D

Yes, the crazy lady got her Cricut for Christmas!!!

It's so pretty isn't it?! It's a collector's edition for National Breast Cancer Month, and came with the special edition Pink Journey cartridge! Plus Plantin Schoolbook and Accent Essentials cartridges.

I got the special edition because it was a fantastic ebay find, an auction that had an incorrectly labeled title, so any passerby would think it was just a regular Cricut for sale. Not to mention that for other unknown but fortunate reasons, it was not being bid up as much as other Cricuts on ebay at the time.

I figured a collector's item would be worth more in the long run, in case I wanted to sell it after all the wedding preparations are over. Also that Pink Journey cartridge? Worth over $100 on average! 0.0 (A normal Cricut cartridge will go for approx $30 on ebay, depending)

After bugging my mom for two hours debating whether I should buy it or not, my mom offered to use her bidding program to help me out. I anxiously waited for the end results...and...wait, what? Who won this?! z***t?! Who the hell is that?!?

I called up my mom saying her bidding program didn't work, z***t won the auction, and started getting slightly frantic. Her response? "Oh, okay then, I guess we'll have to wait til Christmas to see if I really won the auction or not. :D" My mom is always trying to get "surprises" for Christmas gifts, lol.

So obviously I knew she had it :)

Ebay is, apparently, pretty good at disguising bidders names. I don't remember the exact number offhand, but I believe we won the auction around $185 plus approx $25 shipping. Which is a steal considering my mom sold the Pink Journey cartridge for me for $125! :D

(No offense to those who would have kept the cartridge, however I am fortunate enough to not have a breast cancer victim in the family, so I hope that I never need it.)

So, being gifted the Make the Cut! cutting program as well, I had to figure out how the hell to get this thing working!

Coming Up: Setting up your Cricut with Make the Cut!

January 5, 2011

Conquering the DIY Wedding Cake: The Beginning Steps

Whew!

How does anyone take a break from the wedding blog world?!

So many blog posts to catch up on! So many posts needed for this blog!

But I finally finished Weddingbee's updates, and that's the hardest part, in my opinion. (Those ladies know how to post! So many 0.o)

Anywhoo, a post that has been a long time in the making, the wedding cake.

DIY wedding cake.

A gorgeous, modern, white and brown tiered wedding cake with modern roses.A three-word phrase that almost every bride runs away screaming from. Baking cake the day before the wedding? Learning difficult pastry techniques? Not going to happen.

But I believe it can be done!

You just have to find the right fit for you.

All options however, have the same three elements in common:
1) a great cake recipe
2) cake decorating skills and techniques
3) prep work a couple days before the wedding

But not all of these elements have to be scary or difficult.

Finding a luscious cake flavor:

A tasty slice of chocolate cake :)Now, everyone has different tastes when it comes to cake. Fluffy and moist is a good place to start, however I have found my family considers "moist" cake to be almost raw...and mushy. Not quite what I had in mind XP There are thousands of cake recipes and techniques out there. How's a girl to choose?!

Practice runs.

I know most are watching your waistlines, but the only tried-and-true way of finding the special concoction is to taste it. You only have to make one regular-sized 8-9in cake to taste it, and I'm sure you'll have family/friends/coworkers/etc who would love to take the rest off your hands if you're really worried :)

Also the practice runs will give you valuable information on how long it takes to make the recipe and how difficult it is to execute. If you have your heart set on a technically challenging cake, I recommend you recruit help, for the wedding cake AND at least one practice run, to make sure you have the team working together smoothly.

I plan on doing a fun winter cake to test my skills, so I will keep you posted on my cake recipe findings :)

Getting in touch with your inner Ace of Cakes:

Duff Goldman with many of his Ace of Cakes cake creations.No matter if your plans are cupcakes, buttercream cake, or a fondant masterpiece, you have to consider the fact that all of these need pastry skills. Know your limitations or take course to hone your skills!

Joann Fabrics, Michaels, and many other craft stores usually has Wilton cake decorating courses, which is the best way for the average bride-to-be to learn the pastry arts. If you look for special discounts and 40% off coupons for supplies, they can be more affordable. I highly recommend this if you have ANY DIY cake plans. So of course, I plan on taking these classes in the very near future, just need to check to see if it conflicts with the puppy's obedience school :)

At the very least, watch cake decorating shows on TV (there are TONS of them these days, and I adore them!) they do give out little tips here and there, plus you get to see masters at work, and I personally learn from example! Some recommend viewings are Ace of Cakes, Amazing Wedding Cakes (if you get the WE channel), Food Network Challenge (some are food, some are cake), Ultimate Cake Off or even Top Chef: Just Desserts if they have a cake episode.

My absolute favorite? Ace of Cakes!!! Total. cake. eye candy. :D :D :D

Cake Boss and Cupcake Wars are baking shows too but they're not my favorite. Too many other elements, not enough cake making.

I am extremely curious and excited to try a fondant cake, and I know I'm going to try this recipe, from Peggy Weaver's Baking Corner, which seems to be a very good source for wedding cake decorating and fondant tips and help. It is also mentioned that the taste of her marshmallow fondant is a bit better than other varieties! Tutorial to come!

Putting aside time for the cake...right before the wedding:

This is a fairly crucial element. Cakes can be done a little bit further in advance than, say, bouquets and boutonnieres (which should be done the day before or the day of), however if you don't have time 2 or 3 days before the wedding, the DIY route probably won't work for you. I personally would not let cake sit around for more than 3 days for such a special occasion.

Depending on the number of people you need to feed, it could take a good part of a day to construct your cake. The practice runs will help you calculate how much time is needed, but overall I would try your hardest to not make this a rushed process.

Time will be needed to transport and construct the cake the day of as well, whether it's putting tiers together or displaying cupcakes on their stands.

Well, I didn't say it wouldn't be time consuming XP

But for now, those are the beginning building blocks for a successful wedding cake: good recipes, some skills, time and planning.

Some of you may be thinking: "Errr...Sarah...you're not really helping". But wait! Hear me out. I have some clever ideas that make the whole thing a bit easier. And every bit helps right?

November 24, 2010

A Rose By Any Other Material Would Be As Sweet?

Quick little blurb I had to share with you...

(And forgive me if I'm a bit flat today, haven't been feeling so great, I attribute it to stress of the upcoming graduate deadlines XP Anyhoo...)

I was surfing my usual group of drool-worthy wedding blogs, and while looking in the DIY section of Elizabeth Anne Designs, I found a tutorial for a pretty and pink dried flower wreath.

Well, pink is not my thing, but I though dried lavender would be lovely! The bride shared the site were she bought her dried goods, Dried Flowers 'R' Us, and obviously, I had to take a look to see if dried flowers was the secret mecca of having affordable florals.

Well I didn't find any crazy revelations, but I did find these!!!

Affordable dried pinecone roses for wedding decor.
With winter wedding thoughts dancing in my head, I thought these would be great to fill out any flower arrangements I would have!

You can get 400 rose heads for just $57 and 200 stemmed roses for $64!

Adding this lovely woodsy, wintery element to real flower bouquets/centerpieces/etc will help make them look more grand, large and full without paying nearly as much for real flowers!

Sounds good to me!

October 18, 2010

Finally, I'm a Bit More Accessible

Hello existing readers!

I finally bit the bullet and got my very own blog/wedding email! :D

This way I can now communicate with you guys and still remain (fairly) anonymous!

And, when I'm finally engaged, I have a dedicated email to use for all things wedding, and still have some space in my normal inbox!

Woot.

So any questions, comments, anything, feel free to send me a line!

(<---- Just check that little box on the left under "About Me"!)

August 11, 2010

A Different Kind Of Petal Isle...

How can you have an isle you won't trip on, save money on flower petals, and still have a romantic feel?

A wedding aisle with a scrolled rose petal design.
Bingo.

Yea Ever Ours for posting about this very stylish wedding!

August 10, 2010

Sometimes It Helps To Clean Out Your Closet...

Being influenced by the cute rose purse I found earlier, I continued the search for shoes, and found myself being drawn to shoes with cute little flowers on the toes:

Purple strappy shoe with rose embellishment and high heel.
Another purple strappy shoe with rose embellishment and high heel.
Both lovely shoes, both terribly expensive XP

Move on to times when I'm not glued to a computer screen...

I was rummaging through the many, many items in my closet, and I realized that I already had a lovely pair of purple heels, purchased from Payless several years ago for prom...

Similar to this in dark purple:

Simple white strappy shoe with a reasonable heel.
Not a literal photo but you get the idea.

They are perfectly good purple shoes. They're sandals, with a bit of a heel, but doesn't look excruciating to wear...however they're missing that little bit of "wow factor"...

*looks at closet shoes*
*looks at drool worthy internet shoes*
*looks at closet shoes*
*looks at drool worthy internet shoes*
*realizes something obvious*

All I need are some purple flowers to put on the closet shoes! :D

So the search was on for lovely satin fabric flowers!!!

I looked at some flower hair clip sites, My Diva's Closet and Hairflowers.net, and then at the lovely handcrafted world of Etsy.

And I think I found something just wonderful:

A satin purple rose headband from Etsy.
Yes, they are headbands, but I'm sure I can either ask for the flowers only or just remove the flower from the headband once I get it!

AND they come in silver too! So at the very least, the bridesmaids can have matching fabric flowers, and they just need to get themselves some purple or silver shoes.

(If you haven't noticed I have been bouncing around the idea of the 'maids having purple and silver color scheme...)

Much easier than finding cute, stylish, affordable, mid heel purple sandals in a wide range of available sizes. :P

Only possible problem with these flowers is the size, 3 inches may or may not be too much for a regular pair of shoes.

Itching to try it out though :D

August 5, 2010

A New Quest Has Arrived...

...to somehow, someway, make the flowers for this purse:

A purple rose Sondra Roberts purse.
Inside view of the purple rose Sondra Roberts purse.
What would I use it for? Me? The bridesmaids? Really, I have no idea.

But it is gorgeous, isn't it?! 8D

and it comes in silver too:

The Sondra Roberts rose purse in silver.
I knew one of these days I would come into contact with something expensive that I refuse to buy out of principle.

$98 without shipping is too much for a purse. $83 with ship and a 20% off coupon code "TOUTIE" at Lori's Shoes is still too much for a purse.

And we'll have bouquets to look at anyways, so do the purses really matter? Not really.

But a gal still needs a purse...

August 1, 2010

Renting Vs Buying, The More Sane Approach

I began to think about the last two posts and I realized it doesn't have to be all or nothing. I'm sure many brides and events have done a mix of both rentals and purchases to get a nice happy, more work-free medium.

Okay, last post on this, I promise:

Chairs:

Padded chairs = $2.50 each
Cost for 115 = $287.50

Chair Total: $287.50

Linen:

-Tablecloths for round tables = $12 each
-Found at linentablecloth.com
*Cost for 12 = $144
-Tablecloths for buffet tables = $15 each
-Found at cvlinens.com
*Cost for 6 = $90
-Napkins = $0.53 each
-Found at efavormart.com
*Cost for 115 = $60.95

Linen Total: $294.95

Dinnerware:

-10" plates = $0.60 each
*Cost for 115 = $69
-7" salad plates = $0.60 each
*Cost for 115 = $69
-Bread plates = $0.60 each
*Cost for 115 = $69
-Cup and saucer = $1.05 each
*Cost for 115 = $120.75
-Sugar bowl = $1.15 each
*Cost for 24 = $27.60
-Creamer pitcher = $1.15 each
*Cost for 24 = $27.60
-Salt and pepper set = $1 each
-Found at Dollar Tree
*Cost for 24 = $24
-Sauce boat w/stand = $2.15 each
*Cost for 24 = $51.60
-Chargers = $0.38 each
-Hexagon 11" plastic plates found on Ebay
*Cost for 120 = $45

Dinnerware Total: $503.55

Glassware:

-Champagne glasses = $0.39 each
-Plastic glasses found at Sam's Club
*Cost for 120 = $46.37
-Goblet = $0.55 each
*Cost for 115 = $63.25
-Juice (or water) glasses = $0.55 each
*Cost for 115 = $63.25

Glassware Total: $172.87

Silverware:

-Salad fork = $0.16 each
-Found at Sam's Club
*Cost for 120 = $19.40
-Fork = $0.13 each
-Found at Sam's Club
*Cost for 120 = $15.60
-Spoon = $0.12 each
-Found at Sam's Club
*Cost for 120 = $14.40
-Knife = $0.23 each
-Found at Sam's Club
*Cost for 120 = $27.90

Silverware Total: $77.30

Add all these together with the venue rental cost, minus the venue chairs...

Grand Total = $1,846.05

Difference From Renting Everything = $221.85 less

Possible gain from re-sale = $220.57

Possible Net Cost = $1,625.49

This seems to be the best way to go about things, because now you have the rental company taking care of transportation and cleaning of most of the dinner items, what you have to do is wash a lot of silverware, (easier to transport anyways in my opinion,) iron the linens, and bring salt and pepper shakers, chargers, and disposable champagne glasses. After the event you would need to wash the silverware and linens for resale.

So never fear readers, I haven't completely lost my mind and out to buy 100 sets of dishes... :P I just did that for sake of comparison and curiosity!

Okay, really, I'm done with this subject...
:P

July 27, 2010

Sometimes You May Not Want To DIY It...

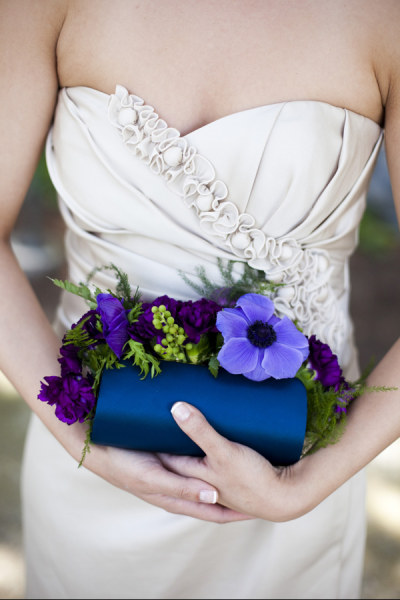
Another wedding idea I would love to incorporate from Ever Ours: clutch bouquets!!! 8D

A bridesmaid holding a very unique clutch bouquet!All the pretty bridesmaid clutch bouquets on display.
At first I thought this would be fantastic for DIY, because it looks like they have less flowers, so it got me wondering how you would go about making one of these things...

and there's not too much information out there if you want real flowers.

Sure silk flowers would be easier to deal with, but I have not been impressed by the price and the quality of a lot of silk flowers out there. (Yet anyways, I should probably due more research on that sometime...) Right now I'd rather just work with real ones!

I could make a bouquet like my tutorial describes and just make it really long and narrow instead of a round dome, and don't wrap up the stems with floral tape and ribbon. But the issue is how to contain moisture from the flowers and not destroy the purses...hmmm...

After browsing a bit I guess the best thing to try is to cover each stem with a floral water tube, (50 for $3 at Save On Crafts!) and maybe contain all the ends in a bag and secure with some waterproof tape or a rubber band.

Or should I just accept the fact that the purses will never be used again?

And how do you keep the purse from opening too much and the flowers from falling out? Just stuff it to the brim?

Not to mention the purses cannot be used for a practical purpose either if they're filled with flowers...

Perhaps they can be transferred to vases before the reception so my gals could actually use them!

I don't know...this seems a bit difficult to pull off...

But for the blog, it might be worth a trial run sometime :)

July 13, 2010

A New Way To Do Wedding Research...

I don't know if this is already widely used, but I have starting using a new research technique that I think would be extremely helpful to all brides-to-be out there.

Facebook.

Yes, it is the evil Facebook that's practically sucking out your personal info and trying to take over the world, but this is a new dynamic (for me anyways,) of looking at venues and vendors alike.

With a Facebook page, the company has to have some description, contact info, and photos. What's great about these photos is most of them are personal, non-professional photos of the venue/vendor in action.

This gives a genuine look of how it really is, so a excited bride does not have to arrive at a professionally photographed venue and be disappointed.

And if the company page doesn't have personal photos posted, anyone who is willing can put up their own personal photos and tag the company in, making it visible on the company's page.

I have already "liked" the Boldt Castle page, and I love it. The status of the page tells me about the weather, how many weddings there are each weekend, if the place is crowded that day, and any events taking place.

Stalk a venue's page long enough and you'll get a decent feel for what the location is like!

I know other sites probably provide this, Twitter, Flickr, etc. but if you don't have another way to access this type of information, try it. I suggest however only using Facebook for research only and put up very minimal information about yourself if you don't already have an account.

Well, back to my usual internet surfing, I hope I helped someone out there!

June 6, 2010

Garage Sales = Potential Goldmine

I love garage saling.

It is wonderful! You can get the shopping bug out of you, you can barter for pretty much anything, and *most* items are cheaply or reasonably priced! What more could a thrifty girl ask for?!

Some may be worried about going the garage sale route. There is no guarantee that you will stumble upon something "perfect" for your centerpieces/cake table/favors/etc. and the quantity of something you find may not be ideal. But for some things, it can really pay off!

While I was garage saling Saturday morning, I found tons of things that could potentially be used for a wedding!

Cake knife and server
Wishing well for cards
(it looked awful but one could fix it up if you really want a wishing well...not my style but to each his own)
Large shallow glass bowls
Decorative stones
Ribbon
Loose dried lavender
Fake flowers
Buttons
Glue
Fabric Paints
Wreaths
Small topiaries
Vases
Photo Albums
Floral Wire
And much more that I presently can't remember, lol

Really, look in the newspaper or on craigslist and start searching! Waking up early for a few Saturday mornings definitely can't hurt :)

June 3, 2010

Was a Nice Day For A White Wedding

I'm back any fellow readers!

Well I had a wonderful time at the wedding, a definite success in my book!

It was a small wedding, with about 50 guests, and this I think made them able to do what they wanted on a budget.

The ceremony was at Duke University's gardens, and omg, I can see why they choose that location.

It. Was. Gorgeous.

Flowers everywhere, cute little walks over streams and around ponds, birds and butterflies fluttering around... Truly a fairly tale setting!

Great tip to take from this ceremony: Pick a venue that is already has tons of character.

This helped me out a bit because I was worried about Boldt Castle being a public place, (it is an attraction for the area,) but for this wedding the visitors were not problem whatsoever. All of them were very polite and kept their distance, their presence was not noticeable during the ceremony at all. If you looked further into the gardens, yeah, people were there, but it didn't affect the mood of the event in any negative way.

Great tip to take from this ceremony: Don't be afraid to have the ceremony in a public place while it's in use. (Just make sure the proper measures are taken.)

There were musicians for the ceremony, a violin and a cello maybe? (I was too busy trying not to be late, lol) And they kept the ceremony short, which was very wise, since it was VERY warm and humid.

Also they were very courteous to their guests saying that it was a semi-casual affair, so the men didn't have to wear jackets. Some came with jackets anyways, to look nice and spiffy :)

Great tip to take from this ceremony: Realize the conditions of your location and try to be courteous to your guests. (i.e. No full Catholic masses outside in the hot sun! XD)

The bride and groom did the smart thing of only having one best man and one maid of honor, no other attendants. (Which saves money on corsages, bouquets, gifts for attendants, etc) But, to include other close family members, they had them do some small readings in the ceremony.

Great tip to take from this ceremony: Others can be included in the ceremony without being a groomsmen/bridesmaid.

Another great tip to take from this ceremony: Give out one program per couple, it will save on paper (and money) and everyone who really wants one has a memento, (I'm sure the date of your high school friend doesn't really want one...) and something to read beforehand.

The reception was at a beautiful hotel nearby, this place was so cute and quaint that it didn't need any decorations! It had a great old-fashioned vibe with a lot of nice modern touches. Even the chairs were stunning, nice dark wood chairs with pretty light blue cushions, so they didn't even need chair covers!

Since the guest list was small, they had the reception in a small dining room in the hotel, usually used for breakfast and whatnot. The only decorations that I saw where a white branch centerpiece to hold the cute bookmark placecards (the groom was very much into books,) and the centerpieces on the tables, which were books, with a teapot filled with flowers on top, accompanied by teacups with flowers in them on either side. But the great thing was that is all they needed!

Repeat great tip to take from this reception: Pick a venue that is already has tons of character.

The food fit the area of the wedding, great Southern cooking! :D It wasn't exactly buffet, but it wasn't individually served either. Servers walked along the tables and served each person from a big bowl of sweet potatoes, green beans, creamed spinach, etc. All the food was delicious, nothing really fancy, but it tasted great! The desserts were a bit more fancy, little truffles and cream puffs! Yum!

Great tip to take from this reception: Food suited for your particular theme might be cheaper than doing the normal sit-down meal.

Another great tip to take from this reception: If you are lucky enough, have a skillful friend make your cake. It was delicious and we had no idea until the couple thanked the friend during a toast, lol.

The drink selection was about 6-7 different types of alcoholic beverages, which included a couple beer and wine selections, and a specialty drink. It was a gin and toxic type drink, and it tasted great! I remember hearing the gin was specially made or something like that... Not to mention the cute little banners that were put in each one, saying "Enjoy!" and "Cheers!" :D

But I'm sure this helped their bar tab immensely, (only certain bottles were opened for certain drinks), and everyone could still drink and be merry!

Great tip to take from this reception: You can limit your alcoholic beverages, and if you pick them well, (i.e. make sure there's one great red wine, one great white wine, one or two great beers, etc), you save money and no one is the wiser!

They had an ipod for the reception playing during dinner, which goes on to probably the only negative to the reception venue, which was that there was not much room to dance. The couple had their first dance in an emptied-out room as others watched from the doorway before having dinner. So it was mostly mingling after dinner and cake was over. However since most of the guests rarely see each other in a big group, catching up was exactly what most wanted to do. So it worked!

Great tip to take from this reception: You don't have to do the normal "pattern" of a wedding if it doesn't work for you or your guests.

Just as a quick note, the bride looked gorgeous in a ivory, almost light yellow A-line spaghetti-strap gown, which was delicately decorated on top with a plain flowy skirt, and it looked lovely on her! The men wore gray suits with yellow shirts, if I'm not mistaken. (Note that the wedding colors were yellow and pink!)

Most of the out-of-town guests stayed at the hotel, and we received the cutest welcome bags ever! They were like pastel colored tiny suitcases, filled with sweets and a few small trinkets. They were really nice!

My bf and I had a fantastic time! Which leads me to my last tip...

Great tip to take from this wedding: A more intimate wedding can make you able to do what you want and make it all the more memorable and meaningful to you in the process.

May 20, 2010

You Have a Drink, and I Have a Notepad...

Weddings are just fun in general, but when you're engaged (or just a little wedding happy :P) they are goldmines for ideas!!!

A really great way to see how a wedding idea pans out is to see it in action, so when I do attend weddings, I'm also taking mental notes throughout the experience.

My bf knows me pretty well, the first wedding we attended he told me "Don't get any ideas." Although I think it was too late by then, tee hee :D

We will be going to one next week, and I'm really excited to see how this one turns out. They seem to be a more modern couple, and really have their ideas in mind, not just what the masses are doing these days.

I'll be sure to post what I liked and what worked in a couple weeks!

May 18, 2010

To DJ or Not to DJ?

As I was thinking of any way I could possibly cut the budget down a few thousand, XP, I wondered, do I really need a DJ? I looked into a few articles about this very subject, and many sources (quite a few of them DJ sites,) say yes, it will make your life easier.

One post from Raleigh Wedding Ideas states that it depends on what you want for the mood of the reception. If you just want music running and few announcements, (what I'm looking for,) then an Ipod setup and designated sound person should work. If you want "all-night dance fest with lights, effects, and an emcee to keep the energy up," (what my bf may want,) "then yes, you need a DJ." Also in the post are helpful hints if you're going the DIY route.

On a more cautionary note, another article, "To DJ or not to DJ: Why an “iPod Wedding is a Bad Idea," (btw I swear I didn't take the title from this XD) warns brides of the many issues with the diy DJ route:

1) Unless you already have a great sound system, you'll have to rent one. Also you'll need a backup ipod.

- Well it's a good thing my bf does own a great sound system then! And we also have many tech-savvy friends, an extra ipod should not be a problem.

2) You'll need someone to "run" the Ipod and "guard" the equipment.

- As long as we have a nice mixed up order to our songs, have someone cue the songs for the dances and pause at the proper times, and put it out of the way, I don't see how this is too much of an issue.

3) You'll need lighting equipment for a proper ambiance.

- I could live without it. (bf might again, be another story)

4) You'll need wireless microphones.

- These can be rented and might even be included with the venue, depending.

5) What if you rented gear breaks down?

- DJs really know how to repair equipment? Just kidding, they may have backup equipment for such an occasion, so this is a reasonable warning.

6) You'll have to transport it and set it up.

- As a penny-pinching, diy bride, I'll have to set up a LOT of things...this is where I get help from willing (hopefully XP) family and friends.

7) The family member/friend helping may not have such a great time, and you may have to pay them.

- This would be discussed with said family member or friend, and if there is a big issue finding someone willing to help, well I guess we'll need a DJ then. But it's not like I would force anyone to do it...

8) They have liability insurance in case the equipment burns the place down.

- Even though this sounds very much like my mother, lol, it is a very good point.

9) You may have to purchase the music you want.

- My bf's and my sister's music selection are so ridiculously large that I don't forsee buying more than a couple songs at the most.

10) An Ipod does not blend the songs together, and this may cause awkward moments on the dance floor.

- Very true, but a determined tech-savvy girl like me can find a program that would blend the songs together! :D May not be at the proper places, (i.e. sounds horrible for a second or two,) but perhaps it would be better than awkward silences? :P

11) DJs keep the reception organized and time the events well.

- If I find the right person to help, and make it very, very simple to follow our instructions, then I think I could pull it off. Hmmm, I'm thinking said person has many alarms on his/her phone, on vibrate, so they can tell when they should be doing something, lol.

In my opinion, there shouldn't be too many "events" that will have to be announced extravagantly. The first dance, toasts, father-daughter dance, bouquet toss, etc, yeah, they need to be announced, but what does it matter if an attending friend does it or not? I don't need a show, I just need an announcement. *shrugs*

Also I feel that my bf and I, with a bit of input, could put together a fun and generally pleasing music list for the reception. I mean we're both reasonable people, it's not like we're going to bore or bother the hell out of the guests with one type of very narrowly liked music.

But I'll be honest, there will be at least a few unique songs very much favored by the bride or groom, lol. (Hey it's our wedding, the guests can handle 1 or 2 songs that represent us, :D)

Bottom line: If my bf feels the same way I do about this, we could possibly make it work. Otherwise, I'll be searching for a somewhat-reasonably priced DJ...

May 10, 2010

How to Make a DIY Wedding Bouquet

Yes, I know it's a bit early to practice making wedding bouquets, but certain circumstances arose:

1) My mom laughed at me when I told her I would try to do my own flowers
2) Mother's Day = flowers everywhere!

So it looked like a good time to get a bunch of lovely flowers and prove to my mother I can accomplish something... :P

I found a fantastic tutorial online that gave enough tips and thorough instructions to make me feel confident enough to try this out.

So, let's make a bouquet!!! :D

First, the flowers: I wanted purple and white flowers, more along the blueish-purple side of things but that color is very hard to find in your local grocery store, so I decided pinkish-purple wouldn't be a disaster. All flowers were purchased at Wegmans, a local grocery store chain, and were in water for about 2 days.

Flowers purchased from Wegmans, a local grocery store, that is the greatest grocery store ever. But that's a different story.
12 White Roses - $10
Light Purple Stock - $9
10 Purple Tulips - $6
Waxflower (greenery with little pink flowers) - $4
Statice (dark purple filler) - $4
4 Leatherleaf (ferns) - $3
Lilacs from my parent's backyard - FREE!
Flower Total: $36 plus tax

It may look like I overdid it on flowers, but wait and see, the size turns out to be pretty decent, so be prepared when making your own.

You will also need floral tape, $2, about 30in of string or twine, white ribbon, $1 at the Dollar Tree :D, 2-3 pearl studded pins, scissors, and a pair of sharp cutters/snips.

Supplies you will need for your bouquet.
Second, prepping the flowers: Even though it sounds destructive, florists recommend that you strip off all the leaves of any flower and strip off the bottom two thirds of the greenery, minus the ferns. They do this because only the tops will show in a hand-tied bouquet, and the extra foliage will just get in the way. This took me about an hour.

All the pretty flowers cut and cleaned!
Before you go on, tie a loop about 3 inches down the string and knot it. This will be used later to make your life easier when securing the bouquet.

Make sure you do this! You won't have enough hands to tie a knot later.
Third, putting the flowers together: I would have taken more pictures of the construction process, but handling the bouquet is a bit difficult to get used to and the last thing I wanted to do was try to stretch my hand out and take a picture, loosen my grip and loose the partial arrangement I spent 20min doing.

My recommendation? Unless you are literally using hydrangea like the tutorial, DO NOT just start poking flowers into your bouquet. I did this the first time around and all I did was making a tangled mess of flower stems, plus I was killing the lilacs and getting little purple flowers everywhere... other tutorials like this one show a different arrangement method of rotating the bouquet and constructing it from the center --> out. To be honest, I didn't rotate mine, :P too hard to do but I did add flowers in a clockwise fashion, as if I was rotating the bouquet anyways.

Another method I used was trying to spread out each flower evenly among the bouquet. If you see a spot/side that needs a certain flower, add it in. Keep trying to evenly distribute everything and I really can't see how you can go wrong.

My bouquet, about to be tied.
Another lovely tip is to have some greenery (I had the ferns) to add on at the very end, arranging them all along the sides of the bouquet to create a "collar" of sorts, making it look more finished.

Also another key point is to make sure you are making a dome shape, do this by putting the flowers at more of an angle towards the floor as you add more and more flowers. By the end of it, you should have a spray of pretty flowers, plus a wide spray of stems underneath it:

That's a lot of stems.
Fourth, securing the bouquet: The tip in this tutorial is great for this part because it makes things SO much easier! All I did was wrap the string around the bouquet at the stems, threaded it through the loop, and pulled until tight.

However, I should have pulled it until firm, and then checked the flowers to make sure that is how I want them arranged, i.e. the flowers are at the proper heights, nothing shifted around too much, etc. Because once you tie the string, those flowers aren't going anywhere! Then I continued to wrap around the stems a few times, and knotted the end before the loop and the other end of the string.

The bouquet, tightly tied.
Fifth, wrapping the stems: A friend helping you hold the bottom of the stems together while you wrap is very, very helpful in this part, because the floral tape will snap if you pull it too hard. You want the tape to go down far enough so you can hold the bouquet comfortably with two hands and not touch the stems.

Not the best job wrapping the stems with floral tape, but it serves its purpose.
Now trim the ends one inch below the tape.

Sixth, wrapping the stems with ribbon:
The only issues I had with this was water dripping on my ribbon and the ribbon looking a bit see-through in certain places, but as long as you try to wrap the ribbon evenly, there's no real issues here. Pin the end into the bouquet with the pearl studded pins, upwards into the stems.

Perhaps thicker ribbon will hide some of the lumps in your stems.
There you have it!!! A lovely wedding bouquet! Not too bad for a first timer, huh?

OMG it looks so pretty!
Another view of the wedding bouquet.
Note the hanging rose...yeah be careful with your stems, they can be pretty fragile.