Showing posts with label DIY. Show all posts

February 23, 2011

How to Get A Phantom Wedding Like David Tutera's My Fair Wedding: Cake

Step 6: Get a romantic wedding cake.

Okay, let's face it, after DIY-ing the lighting, the linens, the bouquets, and the centerpieces, there is no way in hell we would even want to attempt to pull off the skyscraper of a cake presented in My Fair Wedding - Phantom of the Opera episode:

The incredibly huge, multi-tier Phantom of the Opera wedding cake.
Yeah...not happening

So what's a budget girl to do?!

There are workarounds.

Looking back at my DIY wedding cake post, I would go with the deconstructed tiered cake in this situation. Why? Because you do not have to mention that your cakes are for a wedding! And partially avoid the Wedding Industrial Complex (WIC).

Mrs. Pencil's elegant wedding cake buffet.
Photo copyright and courtesy of B. Scott Photography

Wait, what? No really you can! Bear with me.

You look around for some good, reputable, reasonably priced bakeries in your area, and ask for a quote for 4 or 5 round cakes in different sizes. Because it is not a tiered cake or even cupcakes, (which are trendy now so even those will be expensive,) they have no reason to think that it's for a wedding.

If you want to bring your finance with you, just look with him the first time, ask about your options, don't mention the wedding, then leave. Come back on your own a couple weeks later. Even if they remember you, I don't think it would be too problematic, they do want your business after all.

Say it's for a big 50th birthday party, a big fancy gala, a huge family reunion, whatever. If they greatly question your reasons, you probably shouldn't work with them anyways, because they're trying to suck every penny out of you. Look elsewhere.

If you want that true metallic gold look, you will have to pay extra for fondant, because this will be easier to cover with metallic luster. If you can handle having a gold colored cake only, buttercream will be a more budget-friendly option.

The cakes seem to have a lace-like design on the bottom as a border, and possibly minimal design on the sides, small S designs or something like that. This should not induce any extra charges, but check because you never know. The piping isn't that important, it just needs to give the cake some personality so it isn't as plain.

Since you are ordering multiple cakes with minimal decorations, the cost should be less than that of an average wedding cake.

You might be thinking, "But Sarah, that cake is covered with sugar flowers! Every bride knows those are expensive!" And yes, you are right. But the key is to not ask the bakery to do the sugar flowers.

No, I will not say to DIY them. I already gotten a sugar flower kit, and tried to make some myself. My roses aren't half bad, but other flowers? Sad little things. An orchid?! So pitiful. Maybe I can improve my skills later, but without formal training, don't even think about it! XP

You can however, buy them yourself, then just insert them in the cakes the morning of the wedding. A little bit of DIY, but that's the easiest way I can think of, given all the other wedding aspects!

The only place in my opinion to buy your sugar flowers was mentioned in my previous cake decoration post, DiscountSugarFlowers.com!

Here is where you can buy all the pretty and lovely red flowers you would ever need!

Gladiola flower, 3.5in wide, $1.11 each
An affordable red sugar Gladiola flower.
Hibiscus flower, 2.5in wide, $0.72 each
An affordable red sugar hibiscus flower.
Tulip flower, 1.5in wide, $0.78 each
An affordable red sugar tulip flower.
Lily flower, 4in wide, $1.11 each
An affordable red sugar lily flower.
Rose flower, 2in wide, $0.72 each
An affordable red sugar rose flower.If these are too red and not enough burgundy for your liking? Then buy some desert plum or red terracotta lust dust for $2.99 a jar, (a powder made for coloring sugar flowers,) and a small quality paintbrush. Dip your dry brush into the powder, tap off excess, and softly brush where you want the color on the flower. The more swipes you put on, the more intense the color.

I gave you a variety of red flowers just because they don't have the exact kind of look as the flowers given on the Phantom cake, (and that luster dust can only go so far color-wise,) so I tried to give the flowers a varied texture.

How many do you need? Well, this is now a bit debatable. Because the Phantom cake is so lush, the number of flowers you need will add up quickly since you want to completely cover the tops of each cake.

The way I estimated the number of flowers you may need is I first calculated the approximate area covered by each flower, then calculated the price per square inch. (Excel helps out a lot with quick calculations.) Then I calculated the area of each tier. Then I divided the area into slices for each flower, cheaper flowers per square inch got a larger slice than more expensive flowers per square inch. In this way I got the cheapest combinations for the cakes, while still having a variety of flowers. Note that I used only half the surface area of the 6" inch cake, leaving room for a cake topper.

Let's say you have a 6", 8", 10", and 12" cakes.

I'll spare you the details, (email me if you do want the spreadsheet!) but you need 24 Gladiola flowers, 31 Hibiscus flowers, 48 roses, 27 tulips and 18 lilies. However, you can only buy them in specified amounts, so you end up buying 27 Gladiolas, 50 Hibiscus, 54 roses, 36 tulips and 18 lilies, costing you a total of $152.88.

Since sugar flowers can last up to a year in a sealed tupperware container, you can buy all your sugar flowers a month or so in advance to take care of breakage issues or color issues before the big day. As long as you can transport them carefully things should work out fine, you probably will have extras anyways. Place the larger flowers on the cake first, then work the smaller flowers around them.

Yes, even buying them yourself is still very expensive, but the labor involved with asking your bakery to make a couple hundred sugar flowers...I'm sure this is the cheaper option, lol.

So what if you don't have $150 lying around for sugar flowers? Reduce their number. It won't look as lush as the Phantom cake, but you will still get the feel. Buy one less box of flowers for each kind of flower, and now the cost is down to $87.93. Buy one box each of flowers, and the cost goes down to $64.95. It's all up to how much you love the original design and how much you are willing to pay to get it.

In order to figure out pricing, I searched online to look for pricing in the Buffalo area. I found two places that posted their prices, Delish! and Dolci Dessert Bakery.

Dolci has a nicer menu since it gives the option of a mini cake that's even smaller, (and cheaper,) than the 6"!

-Mini cake = $11.50
-6" cake = $20.50
-8" cake = $31.50
-10" cake = $47.00

Since we're using smaller cakes, I'm deducting one box from each sugar flower, making the cost of the sugar flowers $87.93.

Total cost for cakes from Dolci Dessert Bakery = $198.43, plus any extra charges for fondant, metallic coating, etc.

From Delish! we can order:

-6" cake = $26
-8" cake = $48
-10" cake = $65
-12" cake = $85

Total cost for cakes from Delish! = $376.88, plus any extra charges for fondant, metallic coating, etc.

Not bad... *sighs* One can only DIY so much, lol.

On to Step 7: Bridesmaid Dresses!

February 21, 2011

How to Get A Phantom Wedding Like David Tutera's My Fair Wedding: Flower Centerpieces

We already discussed one part of the Phantom flowers, now on to the more challenging one...

Step 5: Create the centerpieces and complete the table decor.

Oh boy. This may be even harder than trying to figure out affordable linens.

Because it always seems like David Tutera's specialty is over-the-top centerpieces...to put this bluntly there really is no way to reasonably recreate his centerpieces. But you can do something on a smaller scale.

As mentioned in the linen post, the florist Studio Fiore posted some lovely photos of their grand centerpieces...

Large gold urns:

A large red rose centerpiece for the My Fair Wedding Phantom of the Opera episode.
Tall flower stands and candle holders:

Large red rose centerpiece and candles for the My Fair Wedding Phantom of the Opera episode.
All accented with fallen chandeliers, numerous candles, and red rose petals:

A complete and decorated table with rose and candle centerpieces for the My Fair Wedding Phantom of the Opera episode.
We'll tackle the easier elements first.

1) Lots of candle holders

Now I have been trying to tackle this one in my spare time. Candles are a universal design element so I know I can incorporate them into whatever I plan for my own wedding.

In previous posts I have mentioned the Dollar Tree as a great place to search for affordable candle holders, and I have had luck looking in other dollar stores finding wrought iron candle holders as well! You never know what you may find, and be sure to check every couple months to look for newly stocked items.

One site that is really helpful is Crafta! This site takes the cake when it comes to affordable candle holders. Sure, some can look plain, but they can be spray painted to be any color you like, and can be easily decorated!

I found a tall 11.5in wire pillar candle holder for just $2.09 when you buy 12 or more!

An extremely affordable tall wire candle holder from Crafta.comAnd for your taper candles, a shorter but still fitting 7.5in wire taper candle holder also just $2.09 each when you buy 12 or more!

An extremely affordable taper wire candle holder from Crafta.comCoat these with some gold spray paint, $4.99 from Joann Fabrics, and you have wonderfully thrifty gold candle holders!

For even more candlelight ambiance, go to Candles DLight and purchase 72 of these amber colored votives with included ivory candles for just $37.99! There are other deals like this online but this site had the cheapest shipping charges as well.

Bulk affordable colored votive candle holders with included candles from Candles DLight.Let's say you need one 14" candle holder and one taper candle holder per guest table, plus 2 of the 14" and 3 of the taper for the head table. Let's say you need 3 cans of spray paint to cover all of those.

Total cost for candle holders = $117.75

2) Lots of candles

In the show they used battery operated candles for safety, however if your venue allows flames onsite, real candles will be cheaper for you. All candles should be in a enclosed candle holder besides the tapered candles, which I don't recommend lighting at all.

The must-have tapered candles can be purchased at the wonderful Dollar Tree, for $0.50 per 10" candle.
For the small taper candles needed for the chandeliers, (mentioned near the end of this post,) go to DiscountCandle.com and get 20 ivory 4" taper candles for $5.65 each!
For pillar candles, try looking at Candles DLight again, 36 count 2"x4.5" ivory pillar candles for just $32.99 plus ship!

We need 15 pillar candles, 3 boxes of small taper candles, 48 taper candles, and the votive candles have already been purchased with their candle holders. Even though we have more pillar candles than we need, these can be distributed on the tables or around the cake, guest book, escort cards, or whatever they are needed :)

Total cost for candles = $73.94

3) Tons of rose petals

Because of the number of petals we need and due to the expensive costs of other parts of this Phantom wedding, we're going to use fake rose petals. Now, now, it won't be a disaster, and the price difference is worth it, so bear with me!

I don't know how the Dollar Tree can get their petals so cheap, but really their 300 white, red or pink petals for $1 just can't be beat.

Dollar Tree rose petals.But how many do we need?

We want pretty heavy coverage on the tables, and Petal Garden says that one needs 2-4 cups of petals to decorate tables with centerpieces. They discuss earlier in the article how many petals are in a cup, and I got an approximate amount of 22. So 88 petals per table for heavy coverage.

Another site Petal Toss, says that one bag will cover 2-3 tables with heavy coverage. One bag seems to be about 10 cups, which is equal to 220 petals, so each table would then need 110 petals. I like this number better, (rather estimate more than less,) so for 14 tables we need approximately 1540 petals, which turns out to be six 300 count red petal bags.

Total cost for rose petals = $6!!!

4) Large rose topiaries

Okay, this can be done, but it must be planned out efficiently. In order to be realistic, many steps should be done a few days in advance, in order to lesson the amount of work done the day beforehand. Bribing family and friends with food and alcohol is almost a must XD there is a lot of labor involved! Remember if you're DIYing your bouquets also that there will be less time and adding stress, however some steps will help out both projects.

What you will need for 13 tables:
-Many, many buckets, plastic tubs or containers
-Either 500 and 250 roses from Amazonia Flowers for $565 or 375 roses from Amazonia Flowers with 350 carnations from Global Rose for a total of $414
-10 bunches of leather leaf ferns from Sam's Club for $60.74
-13 count 19.5" high wire sphere bases from Crafta.com for $3.49 each
-13 floral foam 8" diameter spheres from Save-On-Crafts, 2 for $9.36
-2 cans of gold spray paint from Joann Fabrics for $4.99 each
-greening pins from Save-On-Crafts, 600 for $7.20
-spray bottle, $1 at the Dollar Tree
-floral clippers

Before you start: Ask yourself one question: Do I have air conditioning? Do I know someone who does and wouldn't mind me leaving hundreds of flowers there for a few days? The longevity of your roses depend on this. Heat can easily cause flowers to wilt, keep this in mind before attempting such a floral-intensive project!

Way in advance:
a) Purchase or borrow many buckets, plastic tubs, or large containers that can easily hold the bunches of roses, ferns, and possibly carnations you will receive for your wedding.

b) Purchase wire forms and floral foam.
Wire forms for floral centerpieces.c) Schedule delivery of flowers 3 days before wedding.

d) Spray paint your wire forms gold.

3 days beforehand:
a) Fill all your containers with plenty of water.

b) Once your flowers are delivered quickly put them all in the containers.

c) Prep your flowers. Since you don't need their full stem length, start by cutting each stem at an angle to about 5in in length. Look at my DIY tutorial for prepping reference, with the exception of leaving about 2in of greenery at the tops of the flowers.

The evening beforehand:
a) Fill up your bathtub or more containers with water and flower preservatives. (Read the preservative packet/container to see how much should be added!)

b) Place the foam spheres in the water and wait until they sink to the bottom on their own, approximately 30 seconds.

c) Try to push the 8in spheres into the 7.5in wire forms. If they don't fit, trim all sides a little at a time. You want a snug fit, so it won't move around while you are arranging the flowers. Since they are wire forms, they can probably be bent or moved without too much difficulty. (Hopefully! XP)

d) Start placing ferns around the sphere, in order to eventually completely cover the wires and foam, secure stems and leaves with greening pins.

e) Starting at the top of the sphere, start piercing the flowers into the sphere leaving approx 2in of stem sticking out of the foam. Make circles around this center flower as you move down the sphere.

f) Stop about 3/4 down the sphere, look at the floral photos in the beginning of this post for reference. You can do a full sphere, however you may want to secure the upside down flowers with greening pins to ensure they do not fall out.

g) Decorate the stand to your liking. Add ribbons, bead garland, or whatever your heart desires. (Give a break, this is a long research post! I kinda lost steam at deciding how to dress up the wire forms XP)

The morning of: Using a spray bottle, spray in between the flowers and try to re-moisten the foam to make sure the flowers will last until the evening.

Total cost for large rose centerpieces = $603.81 - $754.81 plus lots of labor

5) "Fallen" chandeliers

Obviously, renting a bunch of crystal chandeliers to just sit on your tables is pretty much out of the budget. I figured there had to be another way!

After lots of searching, I finally found a smaller chandelier that we can use for a wholesale price, without the sketchy wholesaler websites! Yea!

Here at the reputable Koehler Home Decor, you can get a Shabby Chic Scroll Chandelier for just $9.96 each!

An affordable small chandelierAt 9.25" wide and over 2ft long, they are a great size for the table design!

Total cost for chandeliers = $129.48

Okay, so now you have candle holders and candles, rose ball centerpieces, rose petals and fallen chandeliers. I think that's a very complete and decorated table! And if you also have the themed linens to boot?!

Complete decorated table for a Phantom of the Opera wedding.Okay, look past the bad Photoshop-ing...that's one lovely table! :D

So...the cost...

Cost for all centerpiece and table decor = $930.98 - $1081.98

I'll admit, that's a LOT for just some pretty table decor. But at least it won't cost you thousands from a florist.

Realize however, without the rose centerpieces, the total cost drops to $327.17! Remember, flowers are expensive! Just saying :)

On to Step 6: The Cake! :D

February 13, 2011

How to Get A Phantom Wedding Like David Tutera's My Fair Wedding: Flower Bouquets

A continuation of the David Tutera Phantom wedding series, on to the next item...

Step 4: Assemble the bouquets and boutonnieres.

Now, for the bouquets and the boutonnieres, I can say with confidence, you can DIY them. Fortunately, all the bouquets are monochromatic red rose bouquets. The only difference is that the bride's bouquet had sparkly floral picks, and those are very simple to add in.

David Tutera's My Fair Wedding Phantom episode bride bouquet.Follow my DIY bouquet tutorial using only red roses, and as long as you pay very careful attention to the shape of each bouquet, (nice smooth dome,) and do not underestimate the amount of roses you need, it will work out just fine. :)

Where to get all the lovely red roses?

I would highly recommend getting your bulk flowers online, especially if you're going to DIY them anyways. I went to a supposed "wholesale" flower retailer in Buffalo and was fairly disappointed. The flowers were sub-par and it was obvious this was just another florist and not a DIYer's haven. Most of the shop was not for viewing, (and I awkwardly wandered in by accident,) and prices were not widely posted.

Since you don't have to worry about stem length with the bouquets, 16in stems will do just fine, however one site said that the longer the stems, the larger the blooms. (So if you have your heart set on large roses, keep this in mind.)

I searched the many, many wholesale flower sites, and I found the biggest bang for your buck was at Amazonia Flowers for 16" stem or 20" stem roses. You can get 375 16" roses for $280, which comes to $0.75 per stem, and this will more than cover all the bouquets, boutonnieres, corsages, and whatever else you need!

Just because of the number of flowers, I would highly recommend help with the assembly of all the florals, the bouquets the day before, and the boutonnieres at the very earliest the night before.

An easy and affordable way to add bling to your bouquet is to make your own floral picks! Just go to Joann.com and purchase these crystal beads, 52 count on sale for $2.24, or these Swarovski beads, 12 count for $7.86, if you have to have fancy crystals, and a few spools of around 18 gauge jewelry wire, on sale for $2.46 for 10 yards.

Cut approx 28in pieces of wire for each bead you want to include. (The lengths of the wires do not need to reach the ends of the bouquet stems.) Thread the bead to the center of the wire, then bend each end on each side of the bead, and twist the wire underneath all the way down. Put some melted wax on the ends of the wire so it won't prick you while you insert the flower picks, unless you want them in the center of the roses, then leave the ends sharp so they can pierce the flower easier.

If you would rather not go the DIY route, this seems to be a good choice for an affordable florist, try a local grocery store or a Sam's Club, Costco or BJ's. They may be able to do all the work for you and still be reasonably priced. Since the design is simple, nothing should go wrong with the final product.

Edit: I should have done a price breakdown for this, so here it is...

Refer to my DIY bouquet post for details on the floral supplies. This is an estimation for a lot of bouquets, boutonnieres, and corsages (5 maids, 5 groomsmen, plus everyone else) in order to be realistic in pricing. I'd rather estimate for too much rather than too little.

-375 count 16" red roses = $280
-52 count crystal beads = $2.24
-18 gauge jewelry wire = $2.46
-7 spools of floral tape = $14
-1 spool of Dollar Tree twine = $1
-5 spools of Dollar Tree ribbon = $5
-pearl floral pins = $2.99
-Lots of labor = free, or possibly the cost of food and/or wine to convince your family/friends to help you, lol

Total cost for bouquets, boutonnieres, and corsages = $307.69

Now on to the harder part of the flower equation, Step 5: Floral centerpieces...

February 11, 2011

How to Get A Phantom Wedding Like David Tutera's My Fair Wedding: Linens

Another installment of the My Fair Wedding - Phantom series, we're now on to...

Step 3: Design the tablescape.

How you decorate your tables can affect the whole look and mood of your venue, so finding the right combination is key!

In order to be as accurate as possible, I re-watched the show :D and looked on the interwebs for photos of the decorated venue. The florist of the Phantom episode, Studio Fiore posted some lovely photos showing off not only their wonderful centerpieces, (floral post to come later,) but the decorated tables as well! Score!

Thanks to All About the Tables, I found a nifty design tool that can help you visualize how your table settings will look in completion at The Cloth Connection.

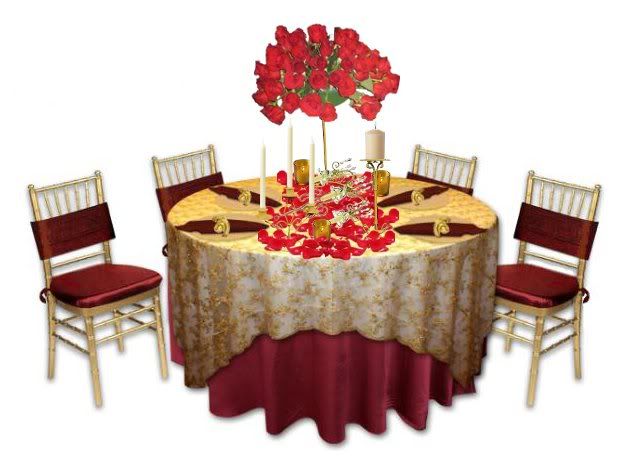
In a nutshell, this is the look we're aiming for:

A Phantom wedding banquet table setup, created by the Cloth Connection table design tool.The tables were decorated with the following:

1) Red damask tablecloths, with a light gold contrast color

This was the hardest part of this post, no lie. Finding detailed banquet tablecloths on the cheap is no cake walk. XP With all the other elements going on with this tablescape, I realized I would have to either focus on other elements or get creative with my options.

The most budget friendly options are either a simple burgundy satin 108" tablecloth for $9.80 each from Linen Tablecloth, or a simple burgundy polyester 120" tablecloth for $11.15 each from Linen Tablecloth.

A burgundy satin tablecloth for banquets or weddings.A burgundy polyester tablecloth for banquets and weddings.


Now, don't give up on me yet! There will be lovely details further down the line, just bear with me. If you can stand having a plain tablecloth, then I recommend not a patterned one, but another burgundy overlay, preferably 90" to cover as much of the tablecloth as possible. Then the gold overlay could lie perpendicular to the first overlay, creating a more elaborate look.

Example of how using two overlays can create a more elaborate look for a banquet or wedding table.The cheapest I could find is an 85" apple red flocking organza overlay for $10.49 each from CV Linens when you buy 12 or more.

An apple red flocking organza overlay for banquets and weddings.I know it's red and not burgundy, but since it is close and since it is organza, it will blend into the burgundy tablecloth and look more like damask rather than looking mis-matched.

2) Gold embroidered overlays

In order to save on the tablecloth and napkins, I kinda splurged a bit on the overlay. My reasoning is if the detail is in the overlay, the elements around it can be more subdued and not look plain. Since tablecloths (usually) cost more than overlays, and napkins are need in massive quantities, I splurge on only the overlays to save on costs in the long run, without sacrificing style! :)

This one I found looks very, very similar to the ones on the show, and is just lovely in my opinion. It's a cream and gold quad organza embroidery 84" overlay for $18 from Prestige Linens.

A quad organza embroidery overlay for banquets and weddings.3) Gold chargers

If you look back at my Christmas Tree Shop charger post, you can see that if you wait patiently, you will find affordable chargers for $1 or even $0.80 each! Just sign up for the Christmas Tree Shop emails and you'll never miss a sales ad!

4) Red and gold scroll-patterned napkins

Paying extra for something as numerous as napkins is just plain not a good idea unless you get a great deal on some fancy fabric and make them on your own. (And when I mean a great deal, I mean $2 per yard or less. Trust me on this one!)

This is why we're going with simple polyester burgundy napkins for $0.50 each from Linen Tablecloth. Especially if you have a more detailed overlay, it's okay to have a plainer napkin!

Burgundy polyester affordable banquet and wedding napkins.If you really want a bit more pizazz, these satin burgundy napkins from eFavorMart will work very nicely as well for $0.65 each!

Affordable satin banquet and wedding napkins.5) Tassel napkin rings

I found some really affordable tassel ties at The Tassel Depot, 100 12" gold tassel ties for just $36! :D *dances*

Gold tassel ties.6) Velvet chair bands/caps with tassels

This was a bit harder to figure out, given the high costs of chair treatments. It will take a bit of DIY, but I believe I have found an affordable solution!

First, purchase the following:
-25 burgundy satin runners, $2.41 each from Linen Tablecloth
-100 yards of 5/8" double faced satin ribbon for $17.50 from The Ribbon Retreat Wholesale
-100 roman gold bookmark tassels for $13 from The Tassel Depot

Now, take the runners and cut them into 4 equal pieces. On the back of each one, use chalk to mark the center of the bottom edge, and then mark 12 inches from the bottom on each side.

First step to creating the DIY chair caps.Draw 2 lines with a ruler connecting these side marks to the center mark to create a tapered point. Now draw 2 more lines 1/2" from those lines.

Step two in making the DIY chair caps.Cut on these lines.

Step 3 in making the DIY chair caps.Hem the pieces on the top and the new tapered sides. Trim off most of the loop on the tassel and sew the remaining tail to the back of the point.

Step four in making the DIY chair caps.Cut four 12" pieces of ribbon. Sew the ends of two ribbons to the back of each corner of the fabric, then sew the ends of the other two ribbons on the back of the fabric, just above each point where the fabric tapers off.

The last step in making the DIY chair caps.Now when you want to put on your chair toppers, you just drape the tapered end over the back of the chair, and tie a pretty bow on each side! Relatively easy chair toppers for just $0.91 per chair!!! :D

So, after all that, what I have created for you is a slight alteration of the original:

My version of a Phantom wedding banquet table setup, created by the Cloth Connection table design tool.But how much does it really cost you?

(For 100 guests, I assume 13 60" 8-person tables plus head table)

Tablecloth costs = $137.20 - $156.10
Overlay costs = $252 ($399 if you use 2 overlays)
Charger costs = $80 - $100
Napkin costs = $50 - $65
Napkin ring costs = $36
Chair cap costs = $91

Grand total for 100 guests = $646.20 - $847.10
Cost per table = $46.16 - $60.50


Nothing to scoff at, but realize you would own all these items, possibly be able to sell some to another bride, and not have to worry about stains or damage. And with the costs of rentals these days, I believe this is actually the cheaper option if you find yourself stuck on such expensive tastes :)

*Whew!* That was nothing short of a doozy! Would you believe I worked so hard on this post that all last night I was dreaming about linens?! No joke. XD It was kinda weird, lol.

On to Step 4: Flowers!

February 8, 2011

How to Get A Phantom Wedding Like David Tutera's My Fair Wedding: Lighting

Continued from the first My Fair Wedding post...

Step 2: Get the mood lighting

Every venue can be dressed up with a little mood lighting. Don't hire expensive lighting companies, do it for approx $24 a spotlight! Here is the original DIY post from Weddingbee, and here's what you need:

-light clamps, $9 each at the Home Depot
-100 watt red flood lights, average cost $6 each, depending on store (check your light clamps to see how much wattage they can take)
-sheet of pine plywood, around $7 for a 2ftx2ft pine plank at the Home Depot
-1/4" bolts and nuts
-large washers with 1/4" opening
-spray paint (for the plywood and/or the light clamps)


To create the base for the lights, refer to the DIY lighting tutorial here from Project Wedding. With this tutorial there's a handy hole in the light handle for the bolt to go through, however since we have cheaper light setups, we have to do this a bit differently.

-First you should connect a piece of plywood sticking straight up in the middle of the 1'x1' board, (with nails or screws or whatever).
-Then place the light clamp securly on the board.
-Then use 2 bolts with associated washers and nuts like the Project Wedding tutorial, except now secure each corner of the clamp so the clamp cannot come off easily.

My rendition of a light stand for a clamp light, a cheap DIY wedding lighting or uplighting option.
My rendition of the light stand alteration

Another alteration on this would be to add walls on each side of the light to hide the ugly looking wires and clamp, however make sure the wood is not too close to the metal lamp, which could cause a fire hazard.

If you can't stand how unsightly the light clamps look, and/or would like a more professional setup, then you could follow the Project Wedding tutorial by the letter, and you will need the following:

-PAR 56 lighting can, $24 at BulbAmerica
-500W Par Can bulb, $15 at BulbAmerica
-colored gel sheet, $1.25 at BulbAmerica
-sheet of pine plywood, around $7 for a 2ftx2ft pine plank at the Home Depot
-1/4" bolts and nuts
-large washers with 1/4" opening
-spray paint (for the plywood and/or the light clamps)


Adding up to a total of $43 per light.

A professional looking DIY uplighting unit from Project Wedding.Since the professional lights are more powerful, you would probably need less of them than you would for the light clamps.

Even though these lighting projects could easy cost around $130 - $150, for the atmosphere it is a lot less than what a professional lighting company would charge. Just please, make sure your venue can handle your power needs! Having great lighting will do you no good when the entire building loses power! XP

On to Step 3: Linens!

January 10, 2011

Conquering the DIY Wedding Cake: Decisions, Decisions

So, you read my first DIY wedding cake post, and you still feel that you have what it takes! Good for you! Here are some of your options:

1) The tiered cake

An elegant purple tiered wedding cake.
I would only recommend this option to the seasoned baker or pastry chef. The simple fact of the matter is you have two options: Last minute assembly before the reception, or nail-biting transport of the cake.

This is due to the fact that a tiered cake will have seams in between each of its layers, so decoration of piping, fondant strip, flowers, etc. will be needed to dress up the area where the tiers meet. If you do this all beforehand, are you really going to guard that 4-tier cake from every bump on the road on the hour car ride to your reception!? Transporting a cake with the tiers separated makes sense for transport.

However then the question is who is going to assemble the tiers once you get it safety to the venue? And who could you trust to do it right? This is why I would personally stay away from this DIY option, if you can help it.

But if you can pull it off, you have the most grand option at your wedding for a fraction of the cost! The real question here is whether all that trouble is worth it.

2) The tiered display cake

Mrs. Deviled Egg's tiered display wedding cake.
This cake would be similar to this display cake constructed by Weddingbee's own Mrs. Deviled Egg. (I thought this was an original idea of mine, just goes to show every wedding idea has been done! lol) This is a cake made of mostly Styrofoam, covered with fondant, with one cake layer for the cake cutting event.

This is a great option for a DIY bride because this can be done in advance. You and your handsome groom will be the only ones to eat this cake, so if you wanted to make it a week beforehand, go for it! This one gives the bride the most room to breathe. You can either order plain sheet cake from a bakery or you could make the sheet cakes yourself, but at least you wouldn't have to worry so much about decoration when dealing with the sheets, just (relatively) match the base color of the cake, and tada! No one will even notice.

The main issue with this option is making sure that the display cake will still look the same after it's been sitting around for an extended period of time. No one will spill anything on it, dust will not dirty up your pristine white fondant, the humid summer air will not melt your buttercream flowers, etc.

Since most of the cake is Styrofoam, you could glue the layers together (minus the cake layer!) for added stability with transport. A tiered display cake assembled in this way will have much more stability than any real cake. If your still worried about the cake layer falling off, make a partial cake layer by cutting out a portion of the Styrofoam and fill it with cake layers. Now every layer can be securely glued together! Just remember where you put the actual cake for the cutting! :)

3) The tiered cake deconstructed

Mrs. Pencil's elegant wedding cake buffet.
Photo copyright and courtesy of B. Scott Photography

This is what I am considering doing for myself. Instead of dealing with the stress of assembling/transporting a tall, tiered masterpiece, do a more modern twist of the wedding cake and do deconstructed, separate layers with varying sizes. Extremely similar to what Weddingbee's Mrs. Pencils did with her cakes.

This way, one doesn't have to worry about having a "fake" display cake, and have all the cake out there for all to see. But this wouldn't be as hard to transport with the individual layers and could be done a couple days in advance as well! The only setup with these cakes would be placing each on a cake stand, which should (hopefully) be easy enough for any helper :)

Another note: Ever heard of the budget saving tip "Don't tell your vendors it's a wedding?" Well it doesn't always work out so easily, (*cough* venue! *cough*) but with this deconstructed style, you can have your cake and at a discount!!! Say it's for a fancy birthday party, 50th anniversary, whatever. Since it's not the usual style of a wedding cake, they won't think twice about it.

4) Small tiered cake with cupcakes or sheet cakes in the back


Cute small wedding cake with cupcakes, all decorated with navy sugar flowers.
Very similar to the previous choices, but now the fancy decorated cake is much smaller, making it easier to manage for a new-comer to baking. Smaller pieces of fondant are easier to drape over cake, less decorations are needed, less worries about the structural integrity of the cake, all equals less stress for the bride!

Similar to the display cake, the sheet cakes do not have to be lavishly decorated, and cupcakes described below will only need minimal decoration, making their execution much easier. This can also be done a couple days in advance.

5) A homestyle cake buffet

A cozy, homestyle wedding cake buffet.
This I believe is the easiest for any bride to do because you don't even have to do anything professional looking! You're going for the homestyle, comforting, straight-from-Mom's-kitchen look, so just swirl your frosting around or smooth it a bit and be done with it! Pick a variety of different flavors to make more interesting! Very stress-free, and great for any causal daytime wedding!

6) Mini-cake favors


Mini Wedding Cake Favors
Probably the most time consuming option, giving all your guests their very own mini wedding cake. It doesn't seem that way at first glance, but realize that unlike cupcakes, your doing all the steps involved with one full wedding cake. So while it's a really fun idea...make sure before you start that you can handle doing something as time consuming as stacking, cutting, frosting, rolling fondant, covering, and decorating 50 times over and not go crazy. XD Which is why I would highly recommend recruiting help for this project!

If one does dare to attempt this, it would truly be a hit with your guests!

I would ask your baker if this would cost more or less than doing that tiered cake you may be considering, however it may end up costing more just due to the amount of labor. But you never know.

(This could also be a good candidate for the "don't mention it's a wedding" tip)

7) Cupcakes

Purple and ivory wedding cupcakes.
This can be one of the easier options if the right elements are chosen. The main goal for this is finding a way to dress them up enough so they look like "bridal" cupcakes. A fancy garnish for each one, some pretty piping, or some lacy cupcake wrappers, will all help elevate your cupcakes to fit in with your wedding.

So if the difference between making your cupcakes "bridal" and "ordinary" are these complicated tiny sugar orchids you're supposed to make yourself...yes, cupcakes will be difficult. If it's adding a small edible flower to each one, then yes, they will be easier. Remember, everything will have to be done 50+ times over!

Another option is filling your cupcakes with special tip made for filling pastries and a pastry bag with some yummy jelly or buttercream. This will help give your cupcakes a special something and make them more like regular wedding cake.

As I'm sure many of you brides know, bakery cupcakes are usually cheaper than traditional bakery wedding cakes. You could also use the "don't mention it's for a wedding" card here, although since they're becoming more popular for weddings, it may or may not be harder to pull off.

8) Dessert buffet

An impressive wedding dessert buffet.
Not a cake person? They DIY may be perfect for you! Go crazy doing anything from pies, to cheesecakes, to a whole dessert assortment! Your only limited by your time and resources before the big day, (ask for help for multiple desserts!) so make sure you do practice runs for this option as well, and set aside time wisely!

So that's the list, I hope I was through enough to include all wedding cake options, and I hope you can find something that's a great fit for you!

January 5, 2011

Conquering the DIY Wedding Cake: The Beginning Steps

Whew!

How does anyone take a break from the wedding blog world?!

So many blog posts to catch up on! So many posts needed for this blog!

But I finally finished Weddingbee's updates, and that's the hardest part, in my opinion. (Those ladies know how to post! So many 0.o)

Anywhoo, a post that has been a long time in the making, the wedding cake.

DIY wedding cake.

A gorgeous, modern, white and brown tiered wedding cake with modern roses.A three-word phrase that almost every bride runs away screaming from. Baking cake the day before the wedding? Learning difficult pastry techniques? Not going to happen.

But I believe it can be done!

You just have to find the right fit for you.

All options however, have the same three elements in common:
1) a great cake recipe
2) cake decorating skills and techniques
3) prep work a couple days before the wedding

But not all of these elements have to be scary or difficult.

Finding a luscious cake flavor:

A tasty slice of chocolate cake :)Now, everyone has different tastes when it comes to cake. Fluffy and moist is a good place to start, however I have found my family considers "moist" cake to be almost raw...and mushy. Not quite what I had in mind XP There are thousands of cake recipes and techniques out there. How's a girl to choose?!

Practice runs.

I know most are watching your waistlines, but the only tried-and-true way of finding the special concoction is to taste it. You only have to make one regular-sized 8-9in cake to taste it, and I'm sure you'll have family/friends/coworkers/etc who would love to take the rest off your hands if you're really worried :)

Also the practice runs will give you valuable information on how long it takes to make the recipe and how difficult it is to execute. If you have your heart set on a technically challenging cake, I recommend you recruit help, for the wedding cake AND at least one practice run, to make sure you have the team working together smoothly.

I plan on doing a fun winter cake to test my skills, so I will keep you posted on my cake recipe findings :)

Getting in touch with your inner Ace of Cakes:

Duff Goldman with many of his Ace of Cakes cake creations.No matter if your plans are cupcakes, buttercream cake, or a fondant masterpiece, you have to consider the fact that all of these need pastry skills. Know your limitations or take course to hone your skills!

Joann Fabrics, Michaels, and many other craft stores usually has Wilton cake decorating courses, which is the best way for the average bride-to-be to learn the pastry arts. If you look for special discounts and 40% off coupons for supplies, they can be more affordable. I highly recommend this if you have ANY DIY cake plans. So of course, I plan on taking these classes in the very near future, just need to check to see if it conflicts with the puppy's obedience school :)

At the very least, watch cake decorating shows on TV (there are TONS of them these days, and I adore them!) they do give out little tips here and there, plus you get to see masters at work, and I personally learn from example! Some recommend viewings are Ace of Cakes, Amazing Wedding Cakes (if you get the WE channel), Food Network Challenge (some are food, some are cake), Ultimate Cake Off or even Top Chef: Just Desserts if they have a cake episode.

My absolute favorite? Ace of Cakes!!! Total. cake. eye candy. :D :D :D

Cake Boss and Cupcake Wars are baking shows too but they're not my favorite. Too many other elements, not enough cake making.

I am extremely curious and excited to try a fondant cake, and I know I'm going to try this recipe, from Peggy Weaver's Baking Corner, which seems to be a very good source for wedding cake decorating and fondant tips and help. It is also mentioned that the taste of her marshmallow fondant is a bit better than other varieties! Tutorial to come!

Putting aside time for the cake...right before the wedding:

This is a fairly crucial element. Cakes can be done a little bit further in advance than, say, bouquets and boutonnieres (which should be done the day before or the day of), however if you don't have time 2 or 3 days before the wedding, the DIY route probably won't work for you. I personally would not let cake sit around for more than 3 days for such a special occasion.

Depending on the number of people you need to feed, it could take a good part of a day to construct your cake. The practice runs will help you calculate how much time is needed, but overall I would try your hardest to not make this a rushed process.

Time will be needed to transport and construct the cake the day of as well, whether it's putting tiers together or displaying cupcakes on their stands.

Well, I didn't say it wouldn't be time consuming XP

But for now, those are the beginning building blocks for a successful wedding cake: good recipes, some skills, time and planning.

Some of you may be thinking: "Errr...Sarah...you're not really helping". But wait! Hear me out. I have some clever ideas that make the whole thing a bit easier. And every bit helps right?

August 10, 2010

Sometimes It Helps To Clean Out Your Closet...

Being influenced by the cute rose purse I found earlier, I continued the search for shoes, and found myself being drawn to shoes with cute little flowers on the toes:

Purple strappy shoe with rose embellishment and high heel.
Another purple strappy shoe with rose embellishment and high heel.
Both lovely shoes, both terribly expensive XP

Move on to times when I'm not glued to a computer screen...

I was rummaging through the many, many items in my closet, and I realized that I already had a lovely pair of purple heels, purchased from Payless several years ago for prom...

Similar to this in dark purple:

Simple white strappy shoe with a reasonable heel.
Not a literal photo but you get the idea.

They are perfectly good purple shoes. They're sandals, with a bit of a heel, but doesn't look excruciating to wear...however they're missing that little bit of "wow factor"...

*looks at closet shoes*
*looks at drool worthy internet shoes*
*looks at closet shoes*
*looks at drool worthy internet shoes*
*realizes something obvious*

All I need are some purple flowers to put on the closet shoes! :D

So the search was on for lovely satin fabric flowers!!!

I looked at some flower hair clip sites, My Diva's Closet and Hairflowers.net, and then at the lovely handcrafted world of Etsy.

And I think I found something just wonderful:

A satin purple rose headband from Etsy.
Yes, they are headbands, but I'm sure I can either ask for the flowers only or just remove the flower from the headband once I get it!

AND they come in silver too! So at the very least, the bridesmaids can have matching fabric flowers, and they just need to get themselves some purple or silver shoes.

(If you haven't noticed I have been bouncing around the idea of the 'maids having purple and silver color scheme...)

Much easier than finding cute, stylish, affordable, mid heel purple sandals in a wide range of available sizes. :P

Only possible problem with these flowers is the size, 3 inches may or may not be too much for a regular pair of shoes.

Itching to try it out though :D