Showing posts with label wedding bouquet. Show all posts

April 26, 2011

I Am A Wedding Schizophrenic.

Hey guys,

I apologize for the lack of posts lately, but I found myself slightly uninspired (soon to be fixed by the Royal Wedding coming up soon...)

So I decided to organize all that wedding inspiration I have been saving up the past year and place it into neatly organized folders, with the potential to go onto Google Docs so I would have access to my stuff from anywhere!

Once I was done, I wondered where my focus for wedding planning was going, so I opened up each folder and looked at the elements I had...

And I found out something slightly troubling...

I'm a wedding schizophrenic. XD

With each category of wedding planning, the dress, the flowers, the decor, the invitations, I had at least three or more major themes.

Obviously, I'm already confused with the winter vs. summer wedding, and that doesn't help matters.

With winter, I'm showing a more nature-oriented and rustic look:

A wonderfully rustic winter pinecone wedding bouquet.A hexagon sugared fruit wedding cake.Hanging leaves wall decor.Cinnamon candles.A textured a-line wedding dress with flowers.

But the summer one is still having an identity crisis...

I don't know if I want more modern, elegant and sleek look:

An elegant and simple white tulip wedding bouquet.A modern wedding cake with chocolate roses.Modern flower chair decor.Modern and elegant luminaries and table numbers.A stunning spring or summer wedding dress with flower appliques.

Or a detailed, lush, romantic, girly affair:

A lush purple wedding bouquet.A traditional wedding cake with square tiers and interesting texture.A stunning crystal wedding ceremony backdrop.Small affordable chandelier.Absolutely stunning beaded ballgown wedding dress.

I seem to approve of both ends of the spectrum! XD

I'm sure this wedding confusion is not going to end for a while, not until I start actually plotting out the nitty gritty details, and a focus starts to appear from my now blurry daydreams...

But until then, I guess being prepared for anything is a good thing, right?!

...right?

XD

February 13, 2011

How to Get A Phantom Wedding Like David Tutera's My Fair Wedding: Flower Bouquets

A continuation of the David Tutera Phantom wedding series, on to the next item...

Step 4: Assemble the bouquets and boutonnieres.

Now, for the bouquets and the boutonnieres, I can say with confidence, you can DIY them. Fortunately, all the bouquets are monochromatic red rose bouquets. The only difference is that the bride's bouquet had sparkly floral picks, and those are very simple to add in.

David Tutera's My Fair Wedding Phantom episode bride bouquet.Follow my DIY bouquet tutorial using only red roses, and as long as you pay very careful attention to the shape of each bouquet, (nice smooth dome,) and do not underestimate the amount of roses you need, it will work out just fine. :)

Where to get all the lovely red roses?

I would highly recommend getting your bulk flowers online, especially if you're going to DIY them anyways. I went to a supposed "wholesale" flower retailer in Buffalo and was fairly disappointed. The flowers were sub-par and it was obvious this was just another florist and not a DIYer's haven. Most of the shop was not for viewing, (and I awkwardly wandered in by accident,) and prices were not widely posted.

Since you don't have to worry about stem length with the bouquets, 16in stems will do just fine, however one site said that the longer the stems, the larger the blooms. (So if you have your heart set on large roses, keep this in mind.)

I searched the many, many wholesale flower sites, and I found the biggest bang for your buck was at Amazonia Flowers for 16" stem or 20" stem roses. You can get 375 16" roses for $280, which comes to $0.75 per stem, and this will more than cover all the bouquets, boutonnieres, corsages, and whatever else you need!

Just because of the number of flowers, I would highly recommend help with the assembly of all the florals, the bouquets the day before, and the boutonnieres at the very earliest the night before.

An easy and affordable way to add bling to your bouquet is to make your own floral picks! Just go to Joann.com and purchase these crystal beads, 52 count on sale for $2.24, or these Swarovski beads, 12 count for $7.86, if you have to have fancy crystals, and a few spools of around 18 gauge jewelry wire, on sale for $2.46 for 10 yards.

Cut approx 28in pieces of wire for each bead you want to include. (The lengths of the wires do not need to reach the ends of the bouquet stems.) Thread the bead to the center of the wire, then bend each end on each side of the bead, and twist the wire underneath all the way down. Put some melted wax on the ends of the wire so it won't prick you while you insert the flower picks, unless you want them in the center of the roses, then leave the ends sharp so they can pierce the flower easier.

If you would rather not go the DIY route, this seems to be a good choice for an affordable florist, try a local grocery store or a Sam's Club, Costco or BJ's. They may be able to do all the work for you and still be reasonably priced. Since the design is simple, nothing should go wrong with the final product.

Edit: I should have done a price breakdown for this, so here it is...

Refer to my DIY bouquet post for details on the floral supplies. This is an estimation for a lot of bouquets, boutonnieres, and corsages (5 maids, 5 groomsmen, plus everyone else) in order to be realistic in pricing. I'd rather estimate for too much rather than too little.

-375 count 16" red roses = $280
-52 count crystal beads = $2.24
-18 gauge jewelry wire = $2.46
-7 spools of floral tape = $14
-1 spool of Dollar Tree twine = $1
-5 spools of Dollar Tree ribbon = $5
-pearl floral pins = $2.99
-Lots of labor = free, or possibly the cost of food and/or wine to convince your family/friends to help you, lol

Total cost for bouquets, boutonnieres, and corsages = $307.69

Now on to the harder part of the flower equation, Step 5: Floral centerpieces...

July 27, 2010

Sometimes You May Not Want To DIY It...

Another wedding idea I would love to incorporate from Ever Ours: clutch bouquets!!! 8D

A bridesmaid holding a very unique clutch bouquet!All the pretty bridesmaid clutch bouquets on display.
At first I thought this would be fantastic for DIY, because it looks like they have less flowers, so it got me wondering how you would go about making one of these things...

and there's not too much information out there if you want real flowers.

Sure silk flowers would be easier to deal with, but I have not been impressed by the price and the quality of a lot of silk flowers out there. (Yet anyways, I should probably due more research on that sometime...) Right now I'd rather just work with real ones!

I could make a bouquet like my tutorial describes and just make it really long and narrow instead of a round dome, and don't wrap up the stems with floral tape and ribbon. But the issue is how to contain moisture from the flowers and not destroy the purses...hmmm...

After browsing a bit I guess the best thing to try is to cover each stem with a floral water tube, (50 for $3 at Save On Crafts!) and maybe contain all the ends in a bag and secure with some waterproof tape or a rubber band.

Or should I just accept the fact that the purses will never be used again?

And how do you keep the purse from opening too much and the flowers from falling out? Just stuff it to the brim?

Not to mention the purses cannot be used for a practical purpose either if they're filled with flowers...

Perhaps they can be transferred to vases before the reception so my gals could actually use them!

I don't know...this seems a bit difficult to pull off...

But for the blog, it might be worth a trial run sometime :)

May 17, 2010

A Bouquet Update!

Update for the diy bouquet post:

Astonishingly the flowers lasted about 5 days in water!!!

The flowers were weak at that point, (i.e. shake it and it would become a bouquet of stems) but they still looked pretty!

An exception was the lilacs, those did not last more than 2-3 days before they completely shrunk and wilted.

An interesting fact I found is that tulips keep growing after they have been cut, so it was amusing to see the tulips sprouting out of the bouquet!

I have to say I'm pretty happy with those supermarket flowers!

May 10, 2010

How to Make a DIY Wedding Bouquet

Yes, I know it's a bit early to practice making wedding bouquets, but certain circumstances arose:

1) My mom laughed at me when I told her I would try to do my own flowers
2) Mother's Day = flowers everywhere!

So it looked like a good time to get a bunch of lovely flowers and prove to my mother I can accomplish something... :P

I found a fantastic tutorial online that gave enough tips and thorough instructions to make me feel confident enough to try this out.

So, let's make a bouquet!!! :D

First, the flowers: I wanted purple and white flowers, more along the blueish-purple side of things but that color is very hard to find in your local grocery store, so I decided pinkish-purple wouldn't be a disaster. All flowers were purchased at Wegmans, a local grocery store chain, and were in water for about 2 days.

Flowers purchased from Wegmans, a local grocery store, that is the greatest grocery store ever. But that's a different story.
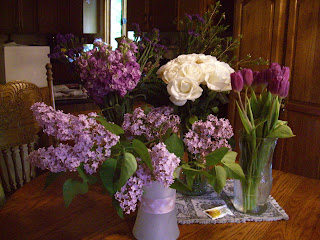
12 White Roses - $10
Light Purple Stock - $9
10 Purple Tulips - $6
Waxflower (greenery with little pink flowers) - $4
Statice (dark purple filler) - $4
4 Leatherleaf (ferns) - $3
Lilacs from my parent's backyard - FREE!
Flower Total: $36 plus tax

It may look like I overdid it on flowers, but wait and see, the size turns out to be pretty decent, so be prepared when making your own.

You will also need floral tape, $2, about 30in of string or twine, white ribbon, $1 at the Dollar Tree :D, 2-3 pearl studded pins, scissors, and a pair of sharp cutters/snips.

Supplies you will need for your bouquet.
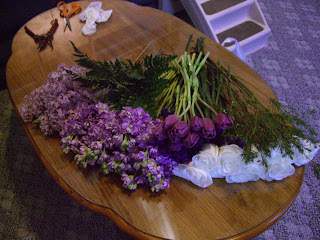
Second, prepping the flowers: Even though it sounds destructive, florists recommend that you strip off all the leaves of any flower and strip off the bottom two thirds of the greenery, minus the ferns. They do this because only the tops will show in a hand-tied bouquet, and the extra foliage will just get in the way. This took me about an hour.

All the pretty flowers cut and cleaned!
Before you go on, tie a loop about 3 inches down the string and knot it. This will be used later to make your life easier when securing the bouquet.

Make sure you do this! You won't have enough hands to tie a knot later.
Third, putting the flowers together: I would have taken more pictures of the construction process, but handling the bouquet is a bit difficult to get used to and the last thing I wanted to do was try to stretch my hand out and take a picture, loosen my grip and loose the partial arrangement I spent 20min doing.

My recommendation? Unless you are literally using hydrangea like the tutorial, DO NOT just start poking flowers into your bouquet. I did this the first time around and all I did was making a tangled mess of flower stems, plus I was killing the lilacs and getting little purple flowers everywhere... other tutorials like this one show a different arrangement method of rotating the bouquet and constructing it from the center --> out. To be honest, I didn't rotate mine, :P too hard to do but I did add flowers in a clockwise fashion, as if I was rotating the bouquet anyways.

Another method I used was trying to spread out each flower evenly among the bouquet. If you see a spot/side that needs a certain flower, add it in. Keep trying to evenly distribute everything and I really can't see how you can go wrong.

My bouquet, about to be tied.
Another lovely tip is to have some greenery (I had the ferns) to add on at the very end, arranging them all along the sides of the bouquet to create a "collar" of sorts, making it look more finished.

Also another key point is to make sure you are making a dome shape, do this by putting the flowers at more of an angle towards the floor as you add more and more flowers. By the end of it, you should have a spray of pretty flowers, plus a wide spray of stems underneath it:

That's a lot of stems.
Fourth, securing the bouquet:
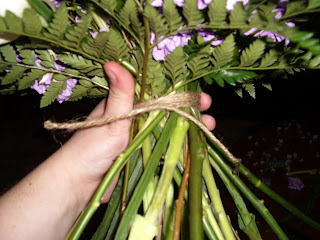
 The tip in this tutorial is great for this part because it makes things SO much easier! All I did was wrap the string around the bouquet at the stems, threaded it through the loop, and pulled until tight.

However, I should have pulled it until firm, and then checked the flowers to make sure that is how I want them arranged, i.e. the flowers are at the proper heights, nothing shifted around too much, etc. Because once you tie the string, those flowers aren't going anywhere! Then I continued to wrap around the stems a few times, and knotted the end before the loop and the other end of the string.

The bouquet, tightly tied.
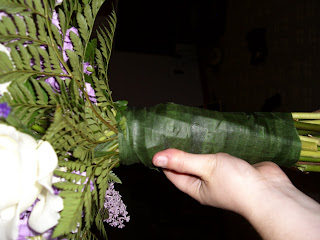
Fifth, wrapping the stems: A friend helping you hold the bottom of the stems together while you wrap is very, very helpful in this part, because the floral tape will snap if you pull it too hard. You want the tape to go down far enough so you can hold the bouquet comfortably with two hands and not touch the stems.

Not the best job wrapping the stems with floral tape, but it serves its purpose.
Now trim the ends one inch below the tape.

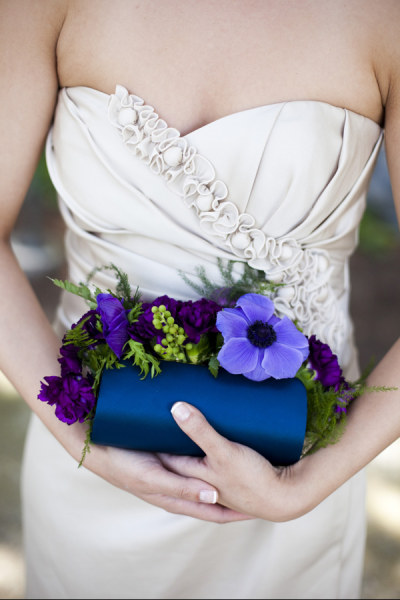
Sixth, wrapping the stems with ribbon:
The only issues I had with this was water dripping on my ribbon and the ribbon looking a bit see-through in certain places, but as long as you try to wrap the ribbon evenly, there's no real issues here. Pin the end into the bouquet with the pearl studded pins, upwards into the stems.

Perhaps thicker ribbon will hide some of the lumps in your stems.
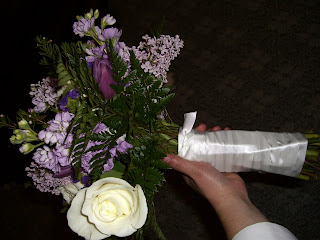
There you have it!!! A lovely wedding bouquet! Not too bad for a first timer, huh?

OMG it looks so pretty!
Another view of the wedding bouquet.
Note the hanging rose...yeah be careful with your stems, they can be pretty fragile.