Showing posts with label floral. Show all posts

February 21, 2011

How to Get A Phantom Wedding Like David Tutera's My Fair Wedding: Flower Centerpieces

We already discussed one part of the Phantom flowers, now on to the more challenging one...

Step 5: Create the centerpieces and complete the table decor.

Oh boy. This may be even harder than trying to figure out affordable linens.

Because it always seems like David Tutera's specialty is over-the-top centerpieces...to put this bluntly there really is no way to reasonably recreate his centerpieces. But you can do something on a smaller scale.

As mentioned in the linen post, the florist Studio Fiore posted some lovely photos of their grand centerpieces...

Large gold urns:

A large red rose centerpiece for the My Fair Wedding Phantom of the Opera episode.
Tall flower stands and candle holders:

Large red rose centerpiece and candles for the My Fair Wedding Phantom of the Opera episode.
All accented with fallen chandeliers, numerous candles, and red rose petals:

A complete and decorated table with rose and candle centerpieces for the My Fair Wedding Phantom of the Opera episode.
We'll tackle the easier elements first.

1) Lots of candle holders

Now I have been trying to tackle this one in my spare time. Candles are a universal design element so I know I can incorporate them into whatever I plan for my own wedding.

In previous posts I have mentioned the Dollar Tree as a great place to search for affordable candle holders, and I have had luck looking in other dollar stores finding wrought iron candle holders as well! You never know what you may find, and be sure to check every couple months to look for newly stocked items.

One site that is really helpful is Crafta! This site takes the cake when it comes to affordable candle holders. Sure, some can look plain, but they can be spray painted to be any color you like, and can be easily decorated!

I found a tall 11.5in wire pillar candle holder for just $2.09 when you buy 12 or more!

An extremely affordable tall wire candle holder from Crafta.comAnd for your taper candles, a shorter but still fitting 7.5in wire taper candle holder also just $2.09 each when you buy 12 or more!

An extremely affordable taper wire candle holder from Crafta.comCoat these with some gold spray paint, $4.99 from Joann Fabrics, and you have wonderfully thrifty gold candle holders!

For even more candlelight ambiance, go to Candles DLight and purchase 72 of these amber colored votives with included ivory candles for just $37.99! There are other deals like this online but this site had the cheapest shipping charges as well.

Bulk affordable colored votive candle holders with included candles from Candles DLight.Let's say you need one 14" candle holder and one taper candle holder per guest table, plus 2 of the 14" and 3 of the taper for the head table. Let's say you need 3 cans of spray paint to cover all of those.

Total cost for candle holders = $117.75

2) Lots of candles

In the show they used battery operated candles for safety, however if your venue allows flames onsite, real candles will be cheaper for you. All candles should be in a enclosed candle holder besides the tapered candles, which I don't recommend lighting at all.

The must-have tapered candles can be purchased at the wonderful Dollar Tree, for $0.50 per 10" candle.
For the small taper candles needed for the chandeliers, (mentioned near the end of this post,) go to DiscountCandle.com and get 20 ivory 4" taper candles for $5.65 each!
For pillar candles, try looking at Candles DLight again, 36 count 2"x4.5" ivory pillar candles for just $32.99 plus ship!

We need 15 pillar candles, 3 boxes of small taper candles, 48 taper candles, and the votive candles have already been purchased with their candle holders. Even though we have more pillar candles than we need, these can be distributed on the tables or around the cake, guest book, escort cards, or whatever they are needed :)

Total cost for candles = $73.94

3) Tons of rose petals

Because of the number of petals we need and due to the expensive costs of other parts of this Phantom wedding, we're going to use fake rose petals. Now, now, it won't be a disaster, and the price difference is worth it, so bear with me!

I don't know how the Dollar Tree can get their petals so cheap, but really their 300 white, red or pink petals for $1 just can't be beat.

Dollar Tree rose petals.But how many do we need?

We want pretty heavy coverage on the tables, and Petal Garden says that one needs 2-4 cups of petals to decorate tables with centerpieces. They discuss earlier in the article how many petals are in a cup, and I got an approximate amount of 22. So 88 petals per table for heavy coverage.

Another site Petal Toss, says that one bag will cover 2-3 tables with heavy coverage. One bag seems to be about 10 cups, which is equal to 220 petals, so each table would then need 110 petals. I like this number better, (rather estimate more than less,) so for 14 tables we need approximately 1540 petals, which turns out to be six 300 count red petal bags.

Total cost for rose petals = $6!!!

4) Large rose topiaries

Okay, this can be done, but it must be planned out efficiently. In order to be realistic, many steps should be done a few days in advance, in order to lesson the amount of work done the day beforehand. Bribing family and friends with food and alcohol is almost a must XD there is a lot of labor involved! Remember if you're DIYing your bouquets also that there will be less time and adding stress, however some steps will help out both projects.

What you will need for 13 tables:
-Many, many buckets, plastic tubs or containers
-Either 500 and 250 roses from Amazonia Flowers for $565 or 375 roses from Amazonia Flowers with 350 carnations from Global Rose for a total of $414
-10 bunches of leather leaf ferns from Sam's Club for $60.74
-13 count 19.5" high wire sphere bases from Crafta.com for $3.49 each
-13 floral foam 8" diameter spheres from Save-On-Crafts, 2 for $9.36
-2 cans of gold spray paint from Joann Fabrics for $4.99 each
-greening pins from Save-On-Crafts, 600 for $7.20
-spray bottle, $1 at the Dollar Tree
-floral clippers

Before you start: Ask yourself one question: Do I have air conditioning? Do I know someone who does and wouldn't mind me leaving hundreds of flowers there for a few days? The longevity of your roses depend on this. Heat can easily cause flowers to wilt, keep this in mind before attempting such a floral-intensive project!

Way in advance:
a) Purchase or borrow many buckets, plastic tubs, or large containers that can easily hold the bunches of roses, ferns, and possibly carnations you will receive for your wedding.

b) Purchase wire forms and floral foam.
Wire forms for floral centerpieces.c) Schedule delivery of flowers 3 days before wedding.

d) Spray paint your wire forms gold.

3 days beforehand:
a) Fill all your containers with plenty of water.

b) Once your flowers are delivered quickly put them all in the containers.

c) Prep your flowers. Since you don't need their full stem length, start by cutting each stem at an angle to about 5in in length. Look at my DIY tutorial for prepping reference, with the exception of leaving about 2in of greenery at the tops of the flowers.

The evening beforehand:
a) Fill up your bathtub or more containers with water and flower preservatives. (Read the preservative packet/container to see how much should be added!)

b) Place the foam spheres in the water and wait until they sink to the bottom on their own, approximately 30 seconds.

c) Try to push the 8in spheres into the 7.5in wire forms. If they don't fit, trim all sides a little at a time. You want a snug fit, so it won't move around while you are arranging the flowers. Since they are wire forms, they can probably be bent or moved without too much difficulty. (Hopefully! XP)

d) Start placing ferns around the sphere, in order to eventually completely cover the wires and foam, secure stems and leaves with greening pins.

e) Starting at the top of the sphere, start piercing the flowers into the sphere leaving approx 2in of stem sticking out of the foam. Make circles around this center flower as you move down the sphere.

f) Stop about 3/4 down the sphere, look at the floral photos in the beginning of this post for reference. You can do a full sphere, however you may want to secure the upside down flowers with greening pins to ensure they do not fall out.

g) Decorate the stand to your liking. Add ribbons, bead garland, or whatever your heart desires. (Give a break, this is a long research post! I kinda lost steam at deciding how to dress up the wire forms XP)

The morning of: Using a spray bottle, spray in between the flowers and try to re-moisten the foam to make sure the flowers will last until the evening.

Total cost for large rose centerpieces = $603.81 - $754.81 plus lots of labor

5) "Fallen" chandeliers

Obviously, renting a bunch of crystal chandeliers to just sit on your tables is pretty much out of the budget. I figured there had to be another way!

After lots of searching, I finally found a smaller chandelier that we can use for a wholesale price, without the sketchy wholesaler websites! Yea!

Here at the reputable Koehler Home Decor, you can get a Shabby Chic Scroll Chandelier for just $9.96 each!

An affordable small chandelierAt 9.25" wide and over 2ft long, they are a great size for the table design!

Total cost for chandeliers = $129.48

Okay, so now you have candle holders and candles, rose ball centerpieces, rose petals and fallen chandeliers. I think that's a very complete and decorated table! And if you also have the themed linens to boot?!
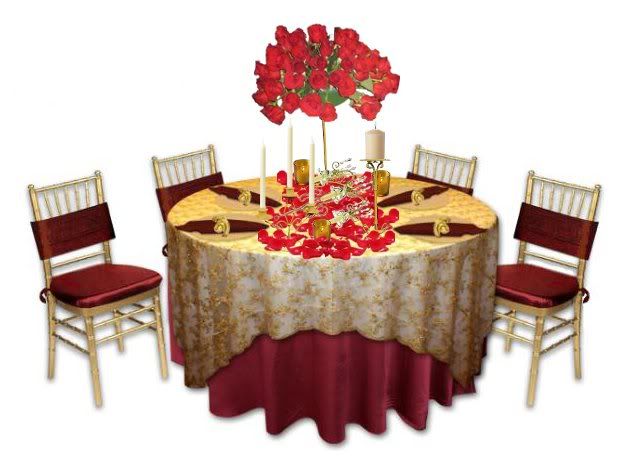
Complete decorated table for a Phantom of the Opera wedding.Okay, look past the bad Photoshop-ing...that's one lovely table! :D

So...the cost...

Cost for all centerpiece and table decor = $930.98 - $1081.98

I'll admit, that's a LOT for just some pretty table decor. But at least it won't cost you thousands from a florist.

Realize however, without the rose centerpieces, the total cost drops to $327.17! Remember, flowers are expensive! Just saying :)

On to Step 6: The Cake! :D

February 13, 2011

How to Get A Phantom Wedding Like David Tutera's My Fair Wedding: Flower Bouquets

A continuation of the David Tutera Phantom wedding series, on to the next item...

Step 4: Assemble the bouquets and boutonnieres.

Now, for the bouquets and the boutonnieres, I can say with confidence, you can DIY them. Fortunately, all the bouquets are monochromatic red rose bouquets. The only difference is that the bride's bouquet had sparkly floral picks, and those are very simple to add in.

David Tutera's My Fair Wedding Phantom episode bride bouquet.Follow my DIY bouquet tutorial using only red roses, and as long as you pay very careful attention to the shape of each bouquet, (nice smooth dome,) and do not underestimate the amount of roses you need, it will work out just fine. :)

Where to get all the lovely red roses?

I would highly recommend getting your bulk flowers online, especially if you're going to DIY them anyways. I went to a supposed "wholesale" flower retailer in Buffalo and was fairly disappointed. The flowers were sub-par and it was obvious this was just another florist and not a DIYer's haven. Most of the shop was not for viewing, (and I awkwardly wandered in by accident,) and prices were not widely posted.

Since you don't have to worry about stem length with the bouquets, 16in stems will do just fine, however one site said that the longer the stems, the larger the blooms. (So if you have your heart set on large roses, keep this in mind.)

I searched the many, many wholesale flower sites, and I found the biggest bang for your buck was at Amazonia Flowers for 16" stem or 20" stem roses. You can get 375 16" roses for $280, which comes to $0.75 per stem, and this will more than cover all the bouquets, boutonnieres, corsages, and whatever else you need!

Just because of the number of flowers, I would highly recommend help with the assembly of all the florals, the bouquets the day before, and the boutonnieres at the very earliest the night before.

An easy and affordable way to add bling to your bouquet is to make your own floral picks! Just go to Joann.com and purchase these crystal beads, 52 count on sale for $2.24, or these Swarovski beads, 12 count for $7.86, if you have to have fancy crystals, and a few spools of around 18 gauge jewelry wire, on sale for $2.46 for 10 yards.

Cut approx 28in pieces of wire for each bead you want to include. (The lengths of the wires do not need to reach the ends of the bouquet stems.) Thread the bead to the center of the wire, then bend each end on each side of the bead, and twist the wire underneath all the way down. Put some melted wax on the ends of the wire so it won't prick you while you insert the flower picks, unless you want them in the center of the roses, then leave the ends sharp so they can pierce the flower easier.

If you would rather not go the DIY route, this seems to be a good choice for an affordable florist, try a local grocery store or a Sam's Club, Costco or BJ's. They may be able to do all the work for you and still be reasonably priced. Since the design is simple, nothing should go wrong with the final product.

Edit: I should have done a price breakdown for this, so here it is...

Refer to my DIY bouquet post for details on the floral supplies. This is an estimation for a lot of bouquets, boutonnieres, and corsages (5 maids, 5 groomsmen, plus everyone else) in order to be realistic in pricing. I'd rather estimate for too much rather than too little.

-375 count 16" red roses = $280
-52 count crystal beads = $2.24
-18 gauge jewelry wire = $2.46
-7 spools of floral tape = $14
-1 spool of Dollar Tree twine = $1
-5 spools of Dollar Tree ribbon = $5
-pearl floral pins = $2.99
-Lots of labor = free, or possibly the cost of food and/or wine to convince your family/friends to help you, lol

Total cost for bouquets, boutonnieres, and corsages = $307.69

Now on to the harder part of the flower equation, Step 5: Floral centerpieces...

February 2, 2011

Even More Comfy Cozy Winter Wedding Inspiration!

Considering the amount of snow days being given throughout the US lately, I figured more winter wedding inspiration would be quite fitting!

This post is best enjoyed with a mug of hot chocolate :)

Or better yet, a mug of hot buttered rum! :D

A mug of hot buttered rum.
The recipe can be found at Real Simple's blog Simply Stated. Am I a dork for thinking of Harry Potter's butterbeer every time I see hot buttered rum? XD

An easy way to get a winter wonderland feel is to include these cute but inexpensive Icelandic bowls from Country Clean Paper Supplies.

An icy looking bowl from Country Clean Paper Supplies.
Starting at $1.50 for a regular 16oz bowl, $5.50 for a 3.5qt bowl, and just $12 for a giant 12qt punch bowl, how could you go wrong?!

This pretty snowflake wedding cake is easy to execute given that the royal icing snowflakes can be done in advance! So then you can bake, assemble and frost, (fondant optional), then add the royal icing snowflakes in small groupings around the cake.

Pale yellow snowflake tiered wedding cake.
It looks like some of the snowflakes were pressed onto the frosting to make an imprint of a snowflake as well as having the royal icing ones attached. However I think doing that technique could easily backfire on a novice cake decorator like I. I would try doing in a pretty blue color though :)

For help on creating the snowflakes, start reading the tutorials at Mahalo and Martha Stewart Weddings. Also check out this forum discussion at Wilton to read more on the difficulties of removing these icing lovelies from wax paper.

o.0

Gorgeous winter flower arrangements by Fauchois Fleurs florist.
*swoon*

So gorgeous for winter, they're frigging perfect! Found on At Home with Kim Vallee, in reference to Fauchois Fleurs florist. You know it's a good florist when you don't care that their site is in French. XD

A cute and creative way to display sweets for a dessert table would be to include these easy-to-make meringue cookie trees!

Meringue cookie tree centerpieces for the holidays or a wedding.
This tutorial at Little Dishy gives her version of the meringue tree, including a rum-flavored icing that will make the cookies easily removable for your guests to enjoy!

I'm loving this beautifully ruched, a-line wedding dress, Cleo by Maggie Sottero:

Cleo by Maggie Sottero, an a-line, ruched wedding dress with a flower sash.
Such clean and modern lines, with a romantic flower sash and corset back...stunning. Usually I don't go for dresses that do not have a lot of beading, but for some reason this seems to have enough character that it doesn't need anything aside from the sash.

Gah, this is the problem though with looking at designer dresses, you're not going to find them used anywhere until they had time to become a little out of style, had the time to be worn for a wedding. So all the latest fashions now won't start popping up until several months pass by.

I tried looking for this model online, and got prices around $900-$950 for sites that did not accept returns XP So I can only assume that this lovely will cost about a grand in a wedding dress boutique. For now.

Maybe I'll be stalking this dress in the used dress classifieds in the fall :) lol, you never know!

November 24, 2010

A Rose By Any Other Material Would Be As Sweet?

Quick little blurb I had to share with you...

(And forgive me if I'm a bit flat today, haven't been feeling so great, I attribute it to stress of the upcoming graduate deadlines XP Anyhoo...)

I was surfing my usual group of drool-worthy wedding blogs, and while looking in the DIY section of Elizabeth Anne Designs, I found a tutorial for a pretty and pink dried flower wreath.

Well, pink is not my thing, but I though dried lavender would be lovely! The bride shared the site were she bought her dried goods, Dried Flowers 'R' Us, and obviously, I had to take a look to see if dried flowers was the secret mecca of having affordable florals.

Well I didn't find any crazy revelations, but I did find these!!!

Affordable dried pinecone roses for wedding decor.
With winter wedding thoughts dancing in my head, I thought these would be great to fill out any flower arrangements I would have!

You can get 400 rose heads for just $57 and 200 stemmed roses for $64!

Adding this lovely woodsy, wintery element to real flower bouquets/centerpieces/etc will help make them look more grand, large and full without paying nearly as much for real flowers!

Sounds good to me!

August 3, 2010

Chandeliers Aren't Just For Candles

I found these gorgeous little chandeliers strangely enough, in a WeddingBee classified ad. But aren't the soo pretty?! :D *drool*

A pretty mini chandelier with roses.
They sell for about $14 each on Amazon...not sure if I'm crazy over the price, because these things are not that big...

But they still are pretty damn cute :)

May 17, 2010

A Bouquet Update!

Update for the diy bouquet post:

Astonishingly the flowers lasted about 5 days in water!!!

The flowers were weak at that point, (i.e. shake it and it would become a bouquet of stems) but they still looked pretty!

An exception was the lilacs, those did not last more than 2-3 days before they completely shrunk and wilted.

An interesting fact I found is that tulips keep growing after they have been cut, so it was amusing to see the tulips sprouting out of the bouquet!

I have to say I'm pretty happy with those supermarket flowers!

May 10, 2010

How to Make a DIY Wedding Bouquet

Yes, I know it's a bit early to practice making wedding bouquets, but certain circumstances arose:

1) My mom laughed at me when I told her I would try to do my own flowers
2) Mother's Day = flowers everywhere!

So it looked like a good time to get a bunch of lovely flowers and prove to my mother I can accomplish something... :P

I found a fantastic tutorial online that gave enough tips and thorough instructions to make me feel confident enough to try this out.

So, let's make a bouquet!!! :D

First, the flowers: I wanted purple and white flowers, more along the blueish-purple side of things but that color is very hard to find in your local grocery store, so I decided pinkish-purple wouldn't be a disaster. All flowers were purchased at Wegmans, a local grocery store chain, and were in water for about 2 days.

Flowers purchased from Wegmans, a local grocery store, that is the greatest grocery store ever. But that's a different story.
12 White Roses - $10
Light Purple Stock - $9
10 Purple Tulips - $6
Waxflower (greenery with little pink flowers) - $4
Statice (dark purple filler) - $4
4 Leatherleaf (ferns) - $3
Lilacs from my parent's backyard - FREE!
Flower Total: $36 plus tax

It may look like I overdid it on flowers, but wait and see, the size turns out to be pretty decent, so be prepared when making your own.

You will also need floral tape, $2, about 30in of string or twine, white ribbon, $1 at the Dollar Tree :D, 2-3 pearl studded pins, scissors, and a pair of sharp cutters/snips.

Supplies you will need for your bouquet.
Second, prepping the flowers: Even though it sounds destructive, florists recommend that you strip off all the leaves of any flower and strip off the bottom two thirds of the greenery, minus the ferns. They do this because only the tops will show in a hand-tied bouquet, and the extra foliage will just get in the way. This took me about an hour.

All the pretty flowers cut and cleaned!
Before you go on, tie a loop about 3 inches down the string and knot it. This will be used later to make your life easier when securing the bouquet.

Make sure you do this! You won't have enough hands to tie a knot later.
Third, putting the flowers together: I would have taken more pictures of the construction process, but handling the bouquet is a bit difficult to get used to and the last thing I wanted to do was try to stretch my hand out and take a picture, loosen my grip and loose the partial arrangement I spent 20min doing.

My recommendation? Unless you are literally using hydrangea like the tutorial, DO NOT just start poking flowers into your bouquet. I did this the first time around and all I did was making a tangled mess of flower stems, plus I was killing the lilacs and getting little purple flowers everywhere... other tutorials like this one show a different arrangement method of rotating the bouquet and constructing it from the center --> out. To be honest, I didn't rotate mine, :P too hard to do but I did add flowers in a clockwise fashion, as if I was rotating the bouquet anyways.

Another method I used was trying to spread out each flower evenly among the bouquet. If you see a spot/side that needs a certain flower, add it in. Keep trying to evenly distribute everything and I really can't see how you can go wrong.

My bouquet, about to be tied.
Another lovely tip is to have some greenery (I had the ferns) to add on at the very end, arranging them all along the sides of the bouquet to create a "collar" of sorts, making it look more finished.

Also another key point is to make sure you are making a dome shape, do this by putting the flowers at more of an angle towards the floor as you add more and more flowers. By the end of it, you should have a spray of pretty flowers, plus a wide spray of stems underneath it:

That's a lot of stems.
Fourth, securing the bouquet: The tip in this tutorial is great for this part because it makes things SO much easier! All I did was wrap the string around the bouquet at the stems, threaded it through the loop, and pulled until tight.

However, I should have pulled it until firm, and then checked the flowers to make sure that is how I want them arranged, i.e. the flowers are at the proper heights, nothing shifted around too much, etc. Because once you tie the string, those flowers aren't going anywhere! Then I continued to wrap around the stems a few times, and knotted the end before the loop and the other end of the string.

The bouquet, tightly tied.
Fifth, wrapping the stems: A friend helping you hold the bottom of the stems together while you wrap is very, very helpful in this part, because the floral tape will snap if you pull it too hard. You want the tape to go down far enough so you can hold the bouquet comfortably with two hands and not touch the stems.

Not the best job wrapping the stems with floral tape, but it serves its purpose.
Now trim the ends one inch below the tape.

Sixth, wrapping the stems with ribbon:
The only issues I had with this was water dripping on my ribbon and the ribbon looking a bit see-through in certain places, but as long as you try to wrap the ribbon evenly, there's no real issues here. Pin the end into the bouquet with the pearl studded pins, upwards into the stems.

Perhaps thicker ribbon will hide some of the lumps in your stems.
There you have it!!! A lovely wedding bouquet! Not too bad for a first timer, huh?

OMG it looks so pretty!
Another view of the wedding bouquet.
Note the hanging rose...yeah be careful with your stems, they can be pretty fragile.