1) My mom laughed at me when I told her I would try to do my own flowers
2) Mother's Day = flowers everywhere!
So it looked like a good time to get a bunch of lovely flowers and prove to my mother I can accomplish something... :P
I found a fantastic tutorial online that gave enough tips and thorough instructions to make me feel confident enough to try this out.
So, let's make a bouquet!!! :D
First, the flowers: I wanted purple and white flowers, more along the blueish-purple side of things but that color is very hard to find in your local grocery store, so I decided pinkish-purple wouldn't be a disaster. All flowers were purchased at Wegmans, a local grocery store chain, and were in water for about 2 days.
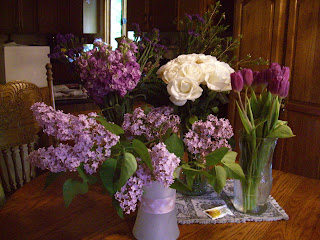
Light Purple Stock - $9
10 Purple Tulips - $6
Waxflower (greenery with little pink flowers) - $4
Statice (dark purple filler) - $4
4 Leatherleaf (ferns) - $3
Lilacs from my parent's backyard - FREE!
Flower Total: $36 plus tax
It may look like I overdid it on flowers, but wait and see, the size turns out to be pretty decent, so be prepared when making your own.
You will also need floral tape, $2, about 30in of string or twine, white ribbon, $1 at the Dollar Tree :D, 2-3 pearl studded pins, scissors, and a pair of sharp cutters/snips.

Second, prepping the flowers: Even though it sounds destructive, florists recommend that you strip off all the leaves of any flower and strip off the bottom two thirds of the greenery, minus the ferns. They do this because only the tops will show in a hand-tied bouquet, and the extra foliage will just get in the way. This took me about an hour.
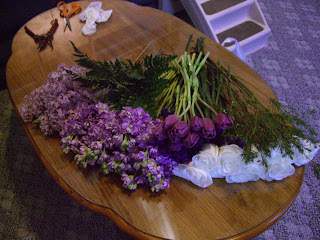
Before you go on, tie a loop about 3 inches down the string and knot it. This will be used later to make your life easier when securing the bouquet.

Third, putting the flowers together: I would have taken more pictures of the construction process, but handling the bouquet is a bit difficult to get used to and the last thing I wanted to do was try to stretch my hand out and take a picture, loosen my grip and loose the partial arrangement I spent 20min doing.
My recommendation? Unless you are literally using hydrangea like the tutorial, DO NOT just start poking flowers into your bouquet. I did this the first time around and all I did was making a tangled mess of flower stems, plus I was killing the lilacs and getting little purple flowers everywhere... other tutorials like this one show a different arrangement method of rotating the bouquet and constructing it from the center --> out. To be honest, I didn't rotate mine, :P too hard to do but I did add flowers in a clockwise fashion, as if I was rotating the bouquet anyways.
Another method I used was trying to spread out each flower evenly among the bouquet. If you see a spot/side that needs a certain flower, add it in. Keep trying to evenly distribute everything and I really can't see how you can go wrong.

Another lovely tip is to have some greenery (I had the ferns) to add on at the very end, arranging them all along the sides of the bouquet to create a "collar" of sorts, making it look more finished.
Also another key point is to make sure you are making a dome shape, do this by putting the flowers at more of an angle towards the floor as you add more and more flowers. By the end of it, you should have a spray of pretty flowers, plus a wide spray of stems underneath it:

Fourth, securing the bouquet: The tip in this tutorial is great for this part because it makes things SO much easier! All I did was wrap the string around the bouquet at the stems, threaded it through the loop, and pulled until tight.
However, I should have pulled it until firm, and then checked the flowers to make sure that is how I want them arranged, i.e. the flowers are at the proper heights, nothing shifted around too much, etc. Because once you tie the string, those flowers aren't going anywhere! Then I continued to wrap around the stems a few times, and knotted the end before the loop and the other end of the string.
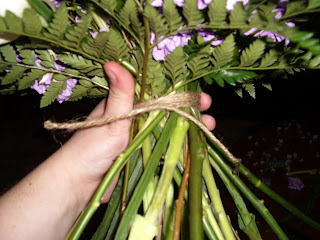
Fifth, wrapping the stems: A friend helping you hold the bottom of the stems together while you wrap is very, very helpful in this part, because the floral tape will snap if you pull it too hard. You want the tape to go down far enough so you can hold the bouquet comfortably with two hands and not touch the stems.
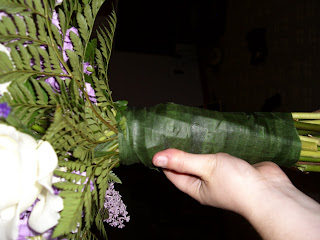
Now trim the ends one inch below the tape.
Sixth, wrapping the stems with ribbon: The only issues I had with this was water dripping on my ribbon and the ribbon looking a bit see-through in certain places, but as long as you try to wrap the ribbon evenly, there's no real issues here. Pin the end into the bouquet with the pearl studded pins, upwards into the stems.
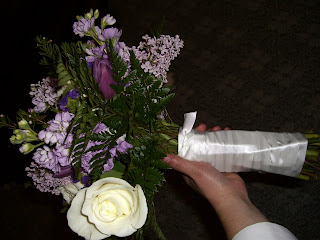
There you have it!!! A lovely wedding bouquet! Not too bad for a first timer, huh?


6 comments:
pretty arrangement...however i thought the bottem should be covered and rounded off so nothing pokes out. i could be wrong. i never seen one before. it is very pretty. i like the colors. i love purple but i'm thinking for me. ill do pale yellows, pinks, and oranges and white. ..maybe no pale orange...i wanna arrange flowers noww. lol
jenn wants to play around with flowers. :)
so i just watched the videos...guess i was wrong :-P...u need to balance out the design according to them. i could have sworn when i saw some things on w e channel and the disney weddings that the bottem stems was not showing that it was all wrapped in ribbon. like u have the ribbon to make it pretty round the center and at the bottem it was wrapped in a green thing and round at the bottem...so nothing was sticking out? it was prob all in my head of how i envisioned it would be when i read the nora roberts bks (there is a new series on weddings. 4 best friends who are in the business of weddings..each in charge of a different part)
WOW!!!! This is stunning! Thank you so much for the tutorial! Keep on posting. Iflorist.co.uk
Thank you so much for the feedback and comments! :D
To goldenblatt: You can do that if you want to, you would just have to find how to wrap the bottom properly so it will still look nice, but the flowers cannot get water that way. If the stems are exposed you can put them in water when your not using the bouquet to keep it from wilting. I have read about some flowers like tulips that should have wax on the ends to make sure no water drips on the dress!
To Beth: The flowers on your site look lovely! However it looks like I can only afford local products :)
thanks for posting this tutorial very usefull for me
Great diy bouquet for excercise , i will try at my home to design like that
Post a Comment